Plumbing problems rarely happen at convenient times. A pipe can burst in the middle of the night, a drain can back up during a family gathering, or a water heater can fail when you need it most. In these situations, emergency plumbing services are essential for protecting your home from extensive water damage and costly repairs. Knowing when a plumbing issue qualifies as an emergency can help homeowners act quickly and avoid serious structural damage, mold growth, and expensive restoration work.
While some plumbing problems can wait for a scheduled appointment, others require immediate professional attention. Ignoring urgent plumbing issues can allow water to spread through walls, floors, and ceilings, creating long term damage that may be difficult and expensive to repair. Understanding the warning signs of a plumbing emergency and knowing who to call can help you minimize damage and restore comfort to your home as quickly as possible.
When Do You Need Emergency Plumbing Services?
Many homeowners struggle to determine whether a plumbing issue truly requires immediate help. Some problems develop gradually and can wait for regular service hours. Others can escalate quickly and threaten your home’s safety and structure.
In general, you should call for emergency plumbing services when a plumbing issue causes active water damage, creates a health hazard, or disrupts essential household systems.
Situations that often require immediate professional assistance include:
Sudden water leaks that cannot be stopped
Flooding caused by broken pipes or plumbing fixtures
Sewage backing up into sinks, tubs, or floor drains
No running water throughout the home
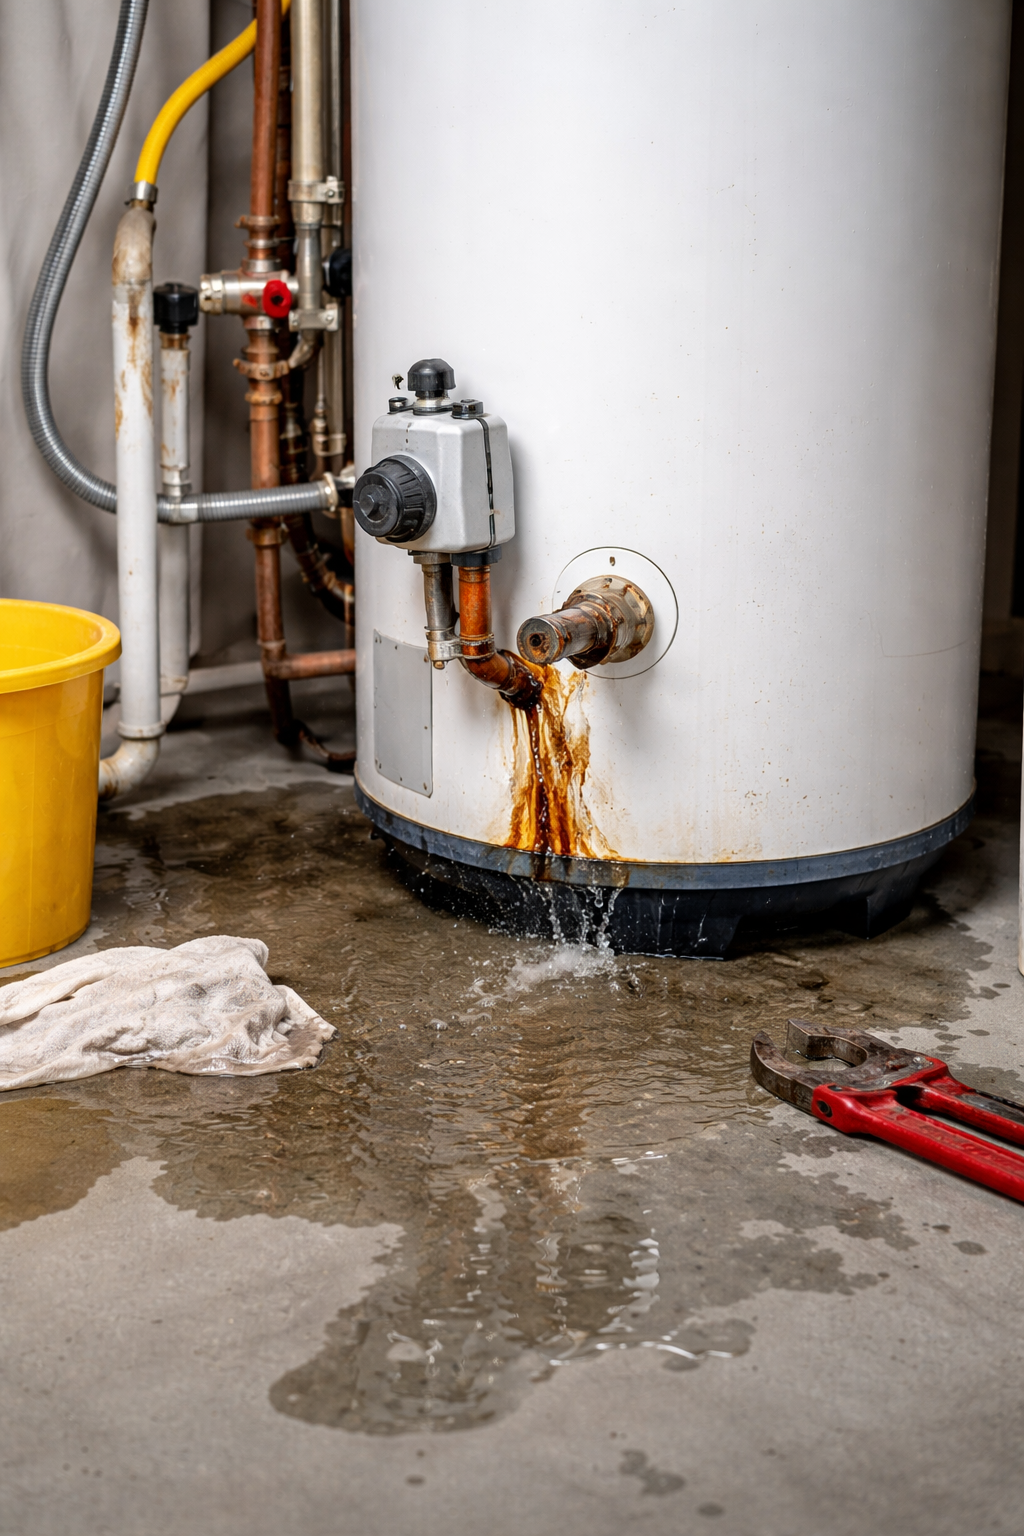
Major water heater leaks or failures
Frozen pipes that have cracked or burst
Severe drain blockages affecting multiple fixtures
When these issues occur, waiting too long to seek help can allow water to spread throughout the home and damage drywall, flooring, insulation, and electrical systems. Professional plumbers have the tools and expertise to quickly identify the source of the problem and stop it before the damage becomes worse.
Emergency plumbing services for burst pipes and flooding
Burst pipes are among the most common and destructive plumbing emergencies homeowners face. When a pipe ruptures, water can pour into your home rapidly, causing extensive flooding in a matter of minutes.
Burst pipes may occur for several reasons, including:
Freezing temperatures that expand water inside pipes
Corrosion in aging plumbing systems
High water pressure stressing pipe connections
Accidental damage during home repairs or renovations
When a pipe bursts, the first step is to shut off the main water supply to prevent additional flooding. After that, contacting emergency plumbing services is critical. Professional plumbers can locate the damaged section of pipe, stop the leak, and perform repairs or replacements quickly.
Fast response is essential because even a small amount of water can cause major problems. Standing water can seep into structural materials and lead to:
Warped flooring
Damaged drywall
Mold and mildew growth
Electrical hazards
Structural deterioration
Emergency plumbers use specialized equipment to repair pipes and minimize water damage, helping homeowners restore their homes faster.
Common Plumbing Emergencies That Can’t Wait
Some plumbing problems might seem minor at first, but can quickly escalate into major emergencies. Recognizing the signs early can help you act quickly and avoid severe damage.
Here are some of the most common plumbing emergencies that require immediate attention.
Sewer backups and severe drain blockages
Sewer backups are one of the most unpleasant and hazardous plumbing emergencies homeowners can experience. When wastewater cannot flow properly through the sewer line, it can back up into sinks, toilets, tubs, or floor drains.
Signs of a sewer backup may include:
Multiple drains clogging at the same time
Sewage odors inside the home
Water backing up in showers or bathtubs when toilets are flushed
Gurgling noises from drains or toilets
Sewage contains harmful bacteria and contaminants that pose serious health risks. Exposure to sewage can lead to illness and contamination of household surfaces.
Emergency plumbing services are necessary in these situations because professional plumbers can safely diagnose the issue and remove the blockage. They may use advanced tools such as drain cameras or hydro jetting equipment to clear the line and restore proper drainage.
Common causes of sewer line blockages include:
Tree roots growing into pipes
Accumulated grease and debris
Flushed wipes or hygiene products
Collapsed or damaged sewer pipes
Because sewer issues can worsen quickly, professional intervention is essential to restore safe and sanitary plumbing conditions.
How fast emergency plumbing services typically respond
One of the biggest advantages of emergency plumbing services is rapid response. Plumbing emergencies can escalate quickly, which is why many professional plumbing companies provide 24-hour support.
Response times may vary depending on location and service availability, but many emergency plumbers aim to arrive within one to two hours of a service call. Fast response allows technicians to assess the problem quickly and begin repairs before damage spreads.
During an emergency service call, professional plumbers typically:
Assess the severity of the problem
Locate the source of the leak or blockage
Shut off water or isolate damaged plumbing lines
Perform immediate repairs or temporary solutions
Recommend permanent repair options if needed
Having experienced technicians handle the problem quickly can significantly reduce the risk of property damage and costly restoration work.
What to Expect from Professional Emergency Plumbers
Calling a professional during a plumbing emergency can feel stressful, especially if the issue occurs late at night or during a holiday. Understanding what emergency plumbers do during a service visit can help homeowners feel more prepared and confident.
Professional emergency plumbing services focus on fast diagnosis, damage prevention, and safe repairs.
Here is what homeowners can typically expect when an emergency plumber arrives.
Rapid inspection and diagnosis
The plumber will first inspect the affected area to determine the cause of the problem. They may use specialized diagnostic tools such as leak detection equipment, pipe cameras, or pressure gauges to identify hidden issues.
Immediate damage control
Stopping the source of water is the top priority. Plumbers may shut off valves, repair broken pipes, or temporarily seal leaks to prevent additional flooding.
Professional repair solutions
Once the immediate threat is under control, the plumber will complete necessary repairs or replacements. Depending on the situation, this may involve fixing pipes, clearing drains, replacing fixtures, or repairing water heaters.
Expert recommendations
Emergency plumbers often provide guidance on preventing similar problems in the future. This may include advice on pipe insulation, drain maintenance, or plumbing system upgrades.
Working with experienced professionals ensures repairs are completed safely and effectively, giving homeowners peace of mind during stressful situations.
Preventing Future Plumbing Emergencies
Although some plumbing emergencies occur unexpectedly, many can be prevented with routine maintenance and early problem detection.
Homeowners can reduce the risk of plumbing emergencies by taking proactive steps, such as:
Scheduling regular plumbing inspections
Insulating exposed pipes before winter
Avoiding flushing wipes, grease, or food waste
Monitoring water pressure levels
Repairing small leaks promptly
Routine maintenance allows plumbers to detect issues before they turn into emergencies. Preventive care helps protect your home while extending the lifespan of your plumbing system.
FAQ About Emergency Plumbing Services
What qualifies as a plumbing emergency?
A plumbing emergency typically involves active water leaks, flooding, sewage backups, or loss of water that threatens your home or health. These issues require immediate professional assistance to prevent property damage.
Should I turn off the water before calling a plumber?
Yes. If possible, shutting off the main water supply can help stop flooding and limit damage. Once the water is off, you should contact emergency plumbing services right away.
Are emergency plumbing services available at night?
Many professional plumbing companies offer 24-hour emergency service. This allows homeowners to get help during nights, weekends, and holidays when urgent plumbing issues occur.
How can I reduce damage while waiting for a plumber?
You can minimize damage by turning off the main water supply, moving valuables away from affected areas, and placing buckets or towels to collect leaking water.
Are emergency plumbing repairs more expensive?
Emergency service may include additional fees due to after-hours response. However, fast repairs often save homeowners money by preventing larger water damage and costly restoration work.
Protect Your Home with Trusted Plumbing Experts
Plumbing emergencies can happen at any time, and when they do, fast professional help is essential. Acting quickly can prevent extensive water damage, protect your home’s structure, and save thousands of dollars in repair costs. Reliable emergency plumbing services ensure that burst pipes, sewer backups, and severe leaks are handled safely and efficiently.
For homeowners in Jackson and Jennings County, Schneider Plumbing, Heating & Air Conditioning has been the trusted choice for dependable plumbing solutions for more than 70 years. As a family-owned company, our team is dedicated to helping neighbors live more comfortably at home with expert plumbing, heating, and cooling services.
If you are dealing with a plumbing emergency or want to protect your home with professional service, contact us today. Our experienced technicians are ready to provide the fast, reliable help you need when it matters most.
Modern homeowners are looking for smarter ways to lower monthly expenses, reduce resource use, and create more comfortable living spaces. One of the most effective and often overlooked upgrades is installing energy-efficient plumbing fixtures. These advanced fixtures are designed to reduce water consumption and the energy required to heat and move water throughout your home. By choosing the right fixtures, families can enjoy dependable performance while shrinking utility bills and minimizing environmental impact. As awareness grows around sustainability and long-term home value, upgrading plumbing fixtures has become a practical investment rather than a luxury.
Energy-efficient plumbing fixtures are not just about saving water. They help reduce energy demand, protect local water supplies, and support a healthier home environment. With improved designs, better materials, and smarter engineering, today’s fixtures deliver comfort and convenience without sacrificing performance. Whether you are remodeling a bathroom, replacing aging fixtures, or building a new home, understanding how these products work and what benefits they offer can help you make confident, cost-effective decisions.
What Makes a Plumbing Fixture Energy Efficient?
Not all plumbing fixtures are created equal. Energy efficiency in plumbing is driven by how much water a fixture uses, how effectively it performs its job, and how it interacts with other systems like water heaters and pumps. Efficient fixtures are engineered to use less water per use while maintaining strong pressure and reliability.
Several characteristics define an energy-efficient plumbing fixture:
Reduced water flow rates that meet or exceed federal efficiency standards.
Smart design features that optimize water delivery, such as aerators or pressure balancing valves.
Compatibility with high-efficiency water heaters and recirculation systems.
Durable construction that reduces leaks, repairs, and premature replacements.
Low-flow technology plays a major role. By limiting gallons per minute or gallons per flush, fixtures reduce the amount of hot water needed, which directly lowers energy consumption. For example, heating water accounts for a significant portion of household energy use. When less hot water is required for daily tasks like washing hands or showering, energy savings add up quickly.
Many energy-efficient fixtures are also certified by programs like WaterSense. These certifications ensure products meet strict performance and efficiency criteria, giving homeowners confidence that they are making responsible choices. Over time, these efficiencies help protect both household budgets and natural resources.
The Top Energy Efficient Plumbing Upgrades
Upgrading your plumbing does not require a complete overhaul to see meaningful benefits. Strategic improvements can deliver immediate savings and long-lasting value. Homeowners often start with fixtures that are used daily, since even small efficiency gains multiply with frequent use.
Popular energy-efficient plumbing upgrades include:
High-efficiency toilets designed to use significantly less water per flush.
Low-flow faucets in kitchens and bathrooms.
Water-saving showerheads that maintain comfort while reducing flow.
Tankless or high-efficiency water heaters that heat water only when needed.
Smart leak detection and monitoring systems that prevent water waste.
These upgrades can be completed individually or as part of a larger home improvement project. A professional plumber can help assess which fixtures will provide the greatest return based on household size, usage patterns, and existing plumbing infrastructure.
Low-Flow Faucets and Dual-Flush Toilets
Among the most impactful upgrades are low-flow faucets and dual flush toilets. Faucets equipped with aerators mix air with water, creating a strong, consistent stream while using less water. This technology is especially effective in bathrooms and kitchens where faucets are turned on and off throughout the day.
Benefits of low-flow faucets include:
Reduced water use without compromising functionality.
Lower energy demand from water heaters.
Simple installation and broad style options.
Dual flush toilets offer two flushing options, one for liquid waste and one for solid waste. This allows users to select the appropriate amount of water for each flush, reducing unnecessary water use. Compared to older toilets, dual flush models can save thousands of gallons of water per year in a typical household.
These fixtures are particularly valuable in busy homes, where frequent use can otherwise drive up utility costs. Over time, the savings from reduced water and energy use can offset the initial investment.
Partnering with Eco-Friendly Plumbing Pros
Choosing the right fixtures is only part of the equation. Proper installation and system integration are essential to achieving maximum efficiency. Working with eco-friendly plumbing professionals ensures that upgrades are installed correctly and optimized for your home’s specific needs.
Experienced plumbers can:
Recommend fixtures that align with efficiency goals and local regulations.
Ensure proper sizing and installation to prevent leaks and pressure issues.
Identify additional opportunities to improve water and energy performance.
Provide ongoing maintenance to extend the life of your fixtures.
A professional approach helps avoid common pitfalls, such as mismatched components or improper installation, which can reduce efficiency and lead to costly repairs. Partnering with knowledgeable plumbers also gives homeowners peace of mind that their upgrades will deliver lasting value.
Long-Term Savings and Sustainability Benefits
One of the most compelling reasons to invest in energy-efficient plumbing fixtures is the long-term financial benefit. While efficient fixtures may have a higher upfront cost, the reduction in monthly water and energy bills often leads to significant savings over time. These savings are especially noticeable as utility rates continue to rise.
Long-term benefits include:
Lower water bills due to reduced consumption.
Decreased energy costs from heating less water.
Reduced strain on plumbing systems, leading to fewer repairs.
Increased home value and appeal to environmentally conscious buyers.
Beyond personal savings, efficient plumbing supports broader sustainability goals. Conserving water helps protect local watersheds and reduces the energy required for water treatment and distribution. By using less energy, households also lower greenhouse gas emissions associated with power generation.
Energy-efficient plumbing fixtures contribute to a more resilient home. During periods of drought or high demand, homes with efficient fixtures are better equipped to manage limited resources without sacrificing comfort. This resilience is becoming increasingly important as communities adapt to changing environmental conditions.
Rebates for Energy-Efficient Plumbing Upgrades
Many homeowners are surprised to learn that rebates and incentives are often available for installing energy-efficient plumbing fixtures. Utility companies, municipalities, and state programs frequently offer financial incentives to encourage conservation.
Potential incentives may include:
Rebates for WaterSense-certified toilets and faucets.
Discounts on high-efficiency water heaters.
Tax credits for qualifying energy-saving home improvements.
These programs can significantly reduce the upfront cost of upgrades, making efficiency improvements more accessible. A knowledgeable plumbing professional can help identify available rebates and ensure that installations meet program requirements.
Taking advantage of incentives not only saves money but also accelerates the return on investment. Homeowners who combine rebates with long-term utility savings often see payback sooner than expected.
Making the Smart Choice for Your Home
Selecting energy-efficient plumbing fixtures is a proactive step toward a more comfortable, cost-effective, and sustainable home. With modern designs and proven technologies, today’s fixtures make it easier than ever to reduce water and energy use without compromising performance.
When planning upgrades, consider factors such as household usage, existing plumbing systems, and long-term goals. Consulting with trusted professionals ensures that every decision is informed and aligned with your needs. From small fixture replacements to comprehensive system upgrades, each improvement contributes to meaningful savings and environmental stewardship.
For homeowners in Jackson and Jennings County, working with a local, experienced provider makes all the difference. Schneider Plumbing, Heating & Air Conditioning has proudly served the community for over 70 years, helping friends and neighbors live more comfortably at home. As a family-owned HVAC and plumbing company, we are committed to improving customers’ lives through quality heating, cooling, and plumbing services. Our mission is to provide the highest level of service whenever expert help is needed.
If you are ready to explore energy-efficient plumbing upgrades, now is the perfect time to act. Contact us to schedule a consultation and discover how modern plumbing solutions can lower your bills, enhance comfort, and support a more sustainable future for your home.
A leaking water heater is more than just an inconvenience. It can lead to water damage, higher utility bills, mold growth, and in severe cases, complete system failure. Understanding leaking water heater causes is the first step in protecting your home and knowing when a simple repair will solve the problem or when it is time to replace the unit altogether. Water heaters are built to be durable, but constant exposure to heat, pressure, and minerals in the water supply means wear and tear is inevitable over time. By recognizing the warning signs early and responding appropriately, homeowners can avoid costly emergencies and extend the life of their system.
Why Water Heaters Leak in the First Place
Water heaters operate under conditions that naturally stress their components. Inside the tank, water is constantly heated and reheated, causing metal parts to expand and contract. Over years of use, this process weakens seals, fittings, and the tank itself. Add in mineral-rich water, fluctuating water pressure, and regular daily use, and it becomes clear why leaks are a common issue.
Another key reason water heaters leak is age. Most traditional tank-style water heaters last between eight and twelve years. As the unit approaches or exceeds this range, the risk of leaks increases significantly. Internal parts may corrode, valves may fail, and the protective lining inside the tank can break down. While regular maintenance helps slow these processes, it cannot stop them entirely.
Improper installation can also play a role. If connections are not tightened correctly or if the unit is not installed to code, leaks may develop much sooner than expected. In some cases, leaks that appear to be coming from the tank are actually the result of nearby plumbing components failing, which is why professional inspection is so important.
Common Leaking Water Heater Causes
Several specific issues commonly lead to water heater leaks. Some are relatively minor and easy to fix, while others signal a more serious problem.
One of the most frequent causes is corrosion inside the tank. Water naturally contains minerals, and over time, these minerals settle at the bottom of the tank. This sediment can damage the tank lining, allowing rust to form. Once corrosion eats through the metal, the tank will begin to leak, and replacement is usually the only option.
Loose or damaged plumbing connections are another common culprit. The cold water inlet and hot water outlet pipes are connected to the top of the tank using fittings that can loosen over time due to vibration and thermal expansion. Even a small gap can allow water to escape.
Faulty valves are also a frequent source of leaks. Water heaters rely on several valves to operate safely, including the temperature and pressure relief valve and the drain valve. If these components fail, water can leak from the bottom or side of the unit.
Other common leaking water heater causes include:
A cracked tank caused by thermal stress or freezing temperatures
Excessive water pressure that strains internal components
A worn-out anode rod that no longer protects the tank from corrosion
Improper maintenance leading to sediment buildup
Understanding which of these issues is affecting your water heater is essential for determining the right solution.
Checking Connections and Drain Valves
When a leak is discovered, one of the first areas to inspect is the connections and valves. Leaks from the top of the water heater often point to loose or damaged fittings. In many cases, tightening the connections or replacing a worn washer can stop the leak. However, overtightening can cause further damage, so care is required.
The drain valve located near the bottom of the tank is another frequent trouble spot. This valve is used during maintenance to flush sediment from the tank, but over time, it can wear out or become clogged with debris. A faulty drain valve may drip continuously or leak when the tank is under pressure. Replacing the valve is typically straightforward and relatively inexpensive when compared to replacing the entire unit.
It is important to turn off the power or gas supply and the water supply before attempting any inspection or repair. Water heaters combine electricity or gas with water, which can be dangerous without proper precautions. If there is any uncertainty, contacting a licensed plumber is the safest course of action.
The Role of Sediment and Rust Buildup
Sediment buildup plays a major role in many water heater problems, including leaks. As minerals settle at the bottom of the tank, they form a thick layer that insulates the water from the heating element or burner. This forces the system to work harder to heat the water, increasing energy usage and accelerating wear.
Over time, sediment can cause hot spots within the tank, leading to cracks or weakened metal. Rust develops when the anode rod, a sacrificial component designed to corrode instead of the tank, is depleted. Once the anode rod is no longer effective, corrosion attacks the tank itself.
Regular maintenance, such as flushing the tank and inspecting the anode rod, can significantly reduce the risk of sediment-related leaks. Homeowners who skip maintenance often face premature failure, even if the water heater is relatively young.
Repair vs Replacement: What’s the Best Fix?
Deciding whether to repair or replace a leaking water heater depends on several factors, including the age of the unit, the source of the leak, and the overall condition of the system. Some leaks are minor and can be resolved quickly, while others indicate that the water heater is nearing the end of its lifespan.
Repairs make sense when the leak originates from a replaceable component, such as a valve or fitting, and the tank itself is in good condition. In these cases, a professional repair can restore normal operation and extend the life of the unit for several more years.
Replacement becomes the better option when the tank is leaking due to corrosion or structural damage. Once the tank itself fails, repairs are not effective or safe. Continuing to operate a leaking tank can result in flooding or water damage to surrounding areas.
Factors to consider when choosing between repair and replacement include:
The age of the water heater
The cost of the repair compared to replacement
Energy efficiency of the existing unit
Frequency of past repairs
Household hot water demands
A professional plumber can evaluate these factors and provide guidance tailored to your specific situation.
When Replacement Is More Cost-Effective
There are times when replacing a water heater is the most practical and economical choice. If the unit is more than ten years old and experiencing leaks, replacement is often recommended. Older units are less energy efficient and more prone to additional failures, which can lead to repeated repair costs.
Modern water heaters offer improved efficiency, better temperature control, and advanced safety features. Upgrading to a newer model can reduce energy bills and provide more consistent hot water. In some cases, switching to a tankless system may be an option, depending on household needs and plumbing configuration.
Replacement is also more cost-effective when a major component fails. For example, if corrosion has compromised the tank or if multiple components need replacement, the combined cost of repairs may approach or exceed the price of a new unit. Investing in a new water heater provides peace of mind and often comes with a manufacturer’s warranty.
Safety is another important consideration. A leaking water heater can create electrical hazards, damage floors and walls, and promote mold growth. Replacing an unreliable unit reduces these risks and helps protect your home.
Preventing Future Water Heater Leaks
While not all leaks can be prevented, regular maintenance goes a long way toward reducing risk. Annual inspections by a qualified plumber can identify early signs of wear and address small issues before they become major problems. Simple steps like flushing the tank, checking the anode rod, and testing the pressure relief valve help maintain system health.
Homeowners should also pay attention to warning signs such as discolored water, unusual noises, or fluctuating water temperatures. These symptoms often appear before a leak develops and should prompt a professional evaluation.
Installing a drip pan and leak detection device can provide additional protection, especially in finished spaces or areas where water damage would be costly. These measures do not prevent leaks but can minimize damage and alert homeowners quickly.
Call a Trusted Local Expert
If you are dealing with a leaking water heater or want to prevent future problems, professional help makes all the difference. Schneider Plumbing, Heating & Air Conditioning has proudly served Jackson and Jennings County for over 70 years, helping families stay comfortable and safe in their homes. As a family-owned HVAC and plumbing company, we are committed to delivering reliable service, honest recommendations, and quality workmanship every time. Whether you need a minor repair, routine maintenance, or a full water heater replacement, our experienced team is ready to help. Contact us to schedule service and experience the highest level of care from trusted local experts.
Modern homeowners are increasingly looking for ways to make their homes more comfortable, efficient, and easier to manage. One of the most impactful upgrades you can make is installing a smart thermostat. From reducing monthly utility bills to giving you more control over your indoor comfort, the benefits of a smart thermostat extend far beyond simple temperature control. As heating and cooling systems account for a significant portion of household energy use, upgrading to smarter technology is a practical investment that pays off in both convenience and long-term savings.
What Makes Smart Thermostats So Popular?
Smart thermostats have gained popularity because they align perfectly with how people live today. Homeowners want solutions that are intuitive, efficient, and adaptable to their lifestyles. Unlike traditional thermostats that require constant manual adjustments, smart thermostats use intelligent technology to manage your home’s temperature automatically.
Several factors contribute to their widespread adoption, including:
Increased awareness of energy efficiency and sustainability
Growing interest in smart home technology
Rising energy costs that encourage better usage control
The desire for greater comfort and convenience
Smart thermostats learn your habits, respond to changes in your routine, and adjust temperatures accordingly. Over time, this automation leads to improved comfort without the need for constant input. Many models also offer sleek designs and user-friendly interfaces, making them appealing from both a functional and aesthetic standpoint.
Another reason for their popularity is accessibility. Smart thermostats are no longer limited to tech enthusiasts. They are designed for everyday homeowners and can be easily controlled through smartphone apps, tablets, or voice assistants. This combination of ease of use and advanced functionality has made smart thermostats a common upgrade in modern homes.
Top Benefits of Installing a Smart Thermostat
Upgrading to a smart thermostat offers a wide range of advantages that go beyond simple temperature adjustments. These devices are designed to optimize comfort while minimizing energy waste, making them a smart choice for homeowners looking to improve their living environment.
Some of the top benefits include:
Lower energy bills through optimized heating and cooling schedules
Greater control over indoor temperatures from anywhere
Improved comfort with personalized settings
Reduced wear and tear on HVAC systems
Insight into energy usage patterns
One of the most appealing benefits is the ability to create customized schedules. Instead of heating or cooling your home when no one is there, a smart thermostat can automatically reduce energy use during work hours or overnight. This targeted approach ensures your HVAC system works only when needed.
Smart thermostats also provide alerts and reminders, such as when it is time to change air filters or schedule maintenance. These notifications help homeowners stay proactive, which can extend the lifespan of their HVAC equipment and prevent costly repairs.
How Smart Thermostats Improve HVAC Efficiency
HVAC efficiency is a major concern for homeowners, especially in regions with hot summers and cold winters. Smart thermostats play a key role in improving efficiency by ensuring your system operates at optimal levels throughout the year.
Traditional thermostats often lead to inefficiencies because they rely on manual input. Forgetting to adjust the temperature before leaving the house or setting it too high or low can cause unnecessary energy consumption. Smart thermostats eliminate this issue by using sensors, algorithms, and usage data to make informed adjustments automatically.
They improve HVAC efficiency in several ways:
Reducing runtime by adjusting temperatures based on occupancy
Preventing extreme temperature swings that strain the system
Coordinating heating and cooling cycles more effectively
Providing data that helps identify inefficiencies
By maintaining consistent and reasonable temperature settings, smart thermostats help your HVAC system run more smoothly. This reduces stress on components like compressors and blowers, which can lower the risk of breakdowns and improve overall system performance.
Remote Temperature Control and Automation
One of the most convenient features of a smart thermostat is remote temperature control. With a compatible smartphone app, you can adjust your home’s temperature from virtually anywhere. Whether you are returning early from a trip or staying late at work, you can ensure your home is comfortable when you arrive.
Automation takes this convenience even further. Smart thermostats can:
Adjust temperatures based on your location using geofencing
Follow daily and weekly schedules automatically
Adapt to seasonal changes without manual updates
For example, if the thermostat senses that everyone has left the house, it can automatically switch to an energy-saving mode. When someone returns, it restores the preferred temperature. This hands-off approach ensures comfort while reducing wasted energy.
Automation also helps maintain consistent indoor conditions. Instead of sudden temperature changes, smart thermostats make gradual adjustments that feel more natural and comfortable.
Tracking Energy Usage with Smart Apps
Understanding how and when you use energy is essential for making informed decisions about your home. Smart thermostats provide detailed insights through companion apps that track energy usage over time.
These apps allow homeowners to:
View daily, weekly, and monthly energy reports
Identify patterns in heating and cooling usage
Receive tips for improving efficiency
Set energy saving goals
By reviewing this data, you can see how small changes impact your overall energy consumption. For instance, adjusting your thermostat by a few degrees during peak hours can result in noticeable savings. Many smart thermostats also compare your usage to similar households, giving you a benchmark for improvement.
Energy tracking is not just about saving money. It also helps reduce your environmental footprint by minimizing unnecessary energy use. This makes smart thermostats an excellent choice for homeowners who value sustainability.
Compatibility with Existing HVAC Systems
A common concern among homeowners is whether a smart thermostat will work with their current HVAC system. The good news is that most smart thermostats are designed to be compatible with a wide range of heating and cooling setups.
Smart thermostats often work with:
Central heating and air conditioning systems
Heat pumps
Furnaces
Boiler systems
Zoned HVAC systems
Before installation, it is important to confirm compatibility, especially for older systems. Professional HVAC technicians can assess your setup and recommend the best smart thermostat for your home. Proper installation ensures the thermostat communicates effectively with your system and delivers accurate temperature control.
Compatibility also extends to smart home ecosystems. Many smart thermostats integrate seamlessly with popular platforms, allowing you to control them alongside other connected devices. This integration enhances the overall smart home experience and simplifies daily routines.
Smart Home Integration and Everyday Convenience
Smart thermostats are often a central component of a connected home. Their ability to integrate with other smart devices adds another layer of convenience and efficiency.
When integrated with a smart home system, your thermostat can:
Work with voice assistants for hands-free control
Coordinate with smart sensors and devices
Respond to routines and scenes
For example, a morning routine could gradually warm your home, turn on lights, and adjust other settings automatically. At night, a single command can lower the temperature and prepare your home for sleep.
This level of integration not only improves comfort but also simplifies home management. Instead of juggling multiple controls, everything works together seamlessly.
Long Term Value and Return on Investment
While smart thermostats may cost more upfront than traditional models, they offer strong long-term value. Energy savings over time can offset the initial investment, and improved HVAC efficiency can reduce maintenance and repair costs.
Key factors that contribute to return on investment include:
Lower monthly energy bills
Extended HVAC system lifespan
Potential rebates or incentives from utility companies
Increased home appeal and value
Many homeowners notice a reduction in energy costs within the first year of installation. Over time, these savings add up, making smart thermostats a financially sound upgrade.
Upgrade Your Comfort with Schneider Plumbing, Heating & Air Conditioning
If you are considering upgrading to a smart thermostat, professional guidance makes all the difference. For over 70 years, the Schneider Plumbing, Heating & Air Conditioning team has been a reliable plumber helping our friends and neighbors throughout Jackson and Jennings County live more comfortably at home. As a family-owned HVAC company, we are committed to improving our customers’ lives through quality heating, cooling, and plumbing services. It is our mission to provide you with the highest level of service whenever you need the help of an expert. Whether you want to improve energy efficiency, enhance comfort, or integrate smart technology into your home, our experienced technicians are ready to help. Contact us to schedule a consultation and take the first step toward a smarter, more comfortable home today.
Keeping your home comfortable and protected starts with understanding what is happening behind the walls, under sinks, and throughout your plumbing system. A plumbing inspection checklist is one of the most effective tools homeowners can use to identify minor issues before they become expensive emergencies. By routinely checking fixtures, pipes, valves, and water pressure, you can catch leaks, corrosion, and inefficiencies early and extend the life of your plumbing system.
Why You Need a Plumbing Inspection Checklist
Plumbing systems work quietly in the background, which makes it easy to overlook early warning signs of trouble. A structured inspection checklist ensures that no critical component is forgotten and that you evaluate your system in a consistent, thorough way. Without a checklist, homeowners often miss small leaks, slow drains, or subtle pressure changes that signal larger problems.
A plumbing inspection checklist is especially valuable because it helps you stay proactive instead of reactive. Plumbing emergencies can cause water damage, mold growth, and costly repairs. Regular inspections allow you to spot issues while they are still manageable and affordable to fix.
Some of the key benefits of using a plumbing inspection checklist include:
Early detection of leaks that can damage floors, cabinets, and walls
Identification of corrosion or aging pipes before they fail
Improved water efficiency that can lower monthly utility bills
Increased lifespan of fixtures and appliances
Better understanding of when to call a professional plumber
For homeowners planning to sell their property, a documented plumbing inspection can also add confidence for buyers and reduce surprises during a home inspection.
How to Conduct a Step-by-Step Plumbing Check
Completing a plumbing inspection does not require advanced tools or technical expertise. What it does require is attention to detail and a systematic approach. Start by setting aside enough time to inspect your home thoroughly and gather basic supplies such as a flashlight, paper towels, and a notepad to record observations.
Begin your checklist by dividing your home into sections, such as bathrooms, kitchen, laundry area, basement, and exterior plumbing. This helps ensure you inspect every area methodically.
Inspecting Fixtures, Valves, and Drains
Fixtures and drains are some of the most visible and frequently used parts of your plumbing system, making them a logical starting point. Faucets, toilets, showers, and sinks experience daily wear and tear, which can lead to leaks and inefficiencies over time.
When inspecting fixtures, focus on the following steps:
Check faucets for drips, leaks around the base, or loose handles
Inspect under sinks for moisture, stains, or warped cabinetry
Flush toilets and listen for running water after the tank refills
Examine showerheads and tub spouts for leaks or mineral buildup
Ensure shut-off valves turn smoothly and fully close
Drains deserve special attention as well. Slow-draining water can indicate partial clogs or buildup that may worsen if left untreated. Run water in sinks, tubs, and showers to see how quickly it drains and listen for gurgling sounds that may suggest venting issues.
If you notice persistent dripping, pooling water, or foul odors from drains, make note of these issues on your checklist. Even small leaks can waste significant amounts of water and lead to long-term damage if ignored.
Spotting Water Pressure and Leak Issues
Water pressure problems often go unnoticed until they become severe. Low pressure can make daily tasks frustrating, while high pressure can strain pipes and fixtures. During your inspection, test water pressure at multiple fixtures throughout the home.
Signs of water pressure or leak issues include:
Sudden changes in pressure when multiple fixtures are used
Banging or knocking sounds in pipes, often called water hammer
Discolored water that may indicate corrosion inside pipes
Damp spots on walls, ceilings, or floors
Unexplained increases in water bills
To check for hidden leaks, turn off all water-using appliances and fixtures, then observe your water meter. If the meter continues to move, there may be a hidden leak somewhere in the system. This simple test can reveal problems that are not visible during a surface-level inspection.
Be sure to inspect exposed pipes in basements, crawl spaces, or utility rooms. Look for signs of corrosion, rust, or mineral deposits around joints and fittings. These areas are often overlooked but can provide early clues of future pipe failure.
When to Call a Professional Plumber
While a plumbing inspection checklist empowers homeowners to identify many issues, it is important to recognize when professional expertise is needed. Some problems require specialized tools, training, and experience to diagnose and repair safely.
You should consider calling a professional plumber if you encounter:
Persistent leaks that do not resolve with basic tightening or washer replacement
Major corrosion or visible pipe damage
Sewage odors or frequent drain backups
Inconsistent water temperature or pressure throughout the home
Signs of water damage inside walls or ceilings
Professional plumbers can perform more advanced inspections, including camera drain inspections, pressure testing, and water quality analysis. These services provide a deeper understanding of your plumbing system’s condition and help prevent unexpected breakdowns.
Routine Inspections for Older Homes
Homes built several decades ago often have plumbing systems that differ significantly from modern standards. Older pipes made from galvanized steel or cast iron are more prone to corrosion and failure, making routine inspections especially important.
If you live in an older home, your plumbing inspection checklist should include additional considerations:
Inspect visible pipes for rust, flaking, or discoloration
Check for outdated materials that may need replacement
Monitor water pressure carefully to avoid stressing aging pipes
Look for signs of past repairs that may indicate recurring issues
Routine inspections help homeowners of older properties plan upgrades strategically instead of reacting to emergencies. A professional plumber can also advise on phased replacements that improve reliability without requiring a full system overhaul at once.
Making Plumbing Inspections a Habit
Consistency is key when it comes to plumbing maintenance. Completing a plumbing inspection checklist once a year is a good baseline for most homes, but more frequent checks may be beneficial for larger households or properties with older systems.
Consider scheduling inspections:
Annually, as part of regular home maintenance
Before and after extreme weather events
Prior to buying or selling a home
When water bills increase unexpectedly
By making plumbing inspections a routine habit, you stay informed about the condition of your system and can address small issues before they escalate.
Trust Schneider Plumbing, Heating & Air Conditioning for Expert Help
Even the most thorough homeowner inspection has its limits. When you need expert guidance, repairs, or a professional plumbing inspection, Schneider Plumbing, Heating & Air Conditioning is here to help. For over 70 years, the Schneider Plumbing, Heating & Air Conditioning team has been a reliable plumber helping our friends and neighbors throughout Jackson and Jennings County live more comfortably at home. As a family-owned HVAC company, we are committed to improving our customers’ lives through quality heating, cooling, and plumbing services. It is our mission to provide you with the highest level of service whenever you need the help of an expert. If you want peace of mind that your plumbing system is operating safely and efficiently, contact us today to schedule a professional inspection and experience the difference trusted local service can make.