Jayme Reid is an SEO Specialist at BizIQ who writes homeowner guides for Schneider Plumbing, Heating & Air Conditioning, a family-owned Seymour, Indiana company serving the area since 1948. She researches each topic using the U.S. Department of Energy, the EPA, and ENERGY STAR, then has the Schneider team review it for technical accuracy.
The mini split vs central air cost comparison comes down to one question: does your home already have good ductwork? With working ducts, central air is cheaper to buy. Without them, a ductless system usually costs the same or less, and it typically costs less to run in either case. Equipment size, electrical work, and efficiency rating then move the final quote up or down.
Are Mini Splits Cheaper Than Central Air?
Mini splits cost more upfront than central air when a home already has good ductwork, and about the same or less when ducts have to be built or replaced. Whole-home ductless typically runs $8,000 to $15,000 installed. Replacing central air on existing ducts runs $3,900 to $7,900, and central air with new ducts runs $7,000 to $15,000. Mini splits then cost less to operate, because they skip duct losses that the U.S. Department of Energy says can exceed 30% of space-conditioning energy.
Mini Split vs Central Air Cost: Upfront Installation Price
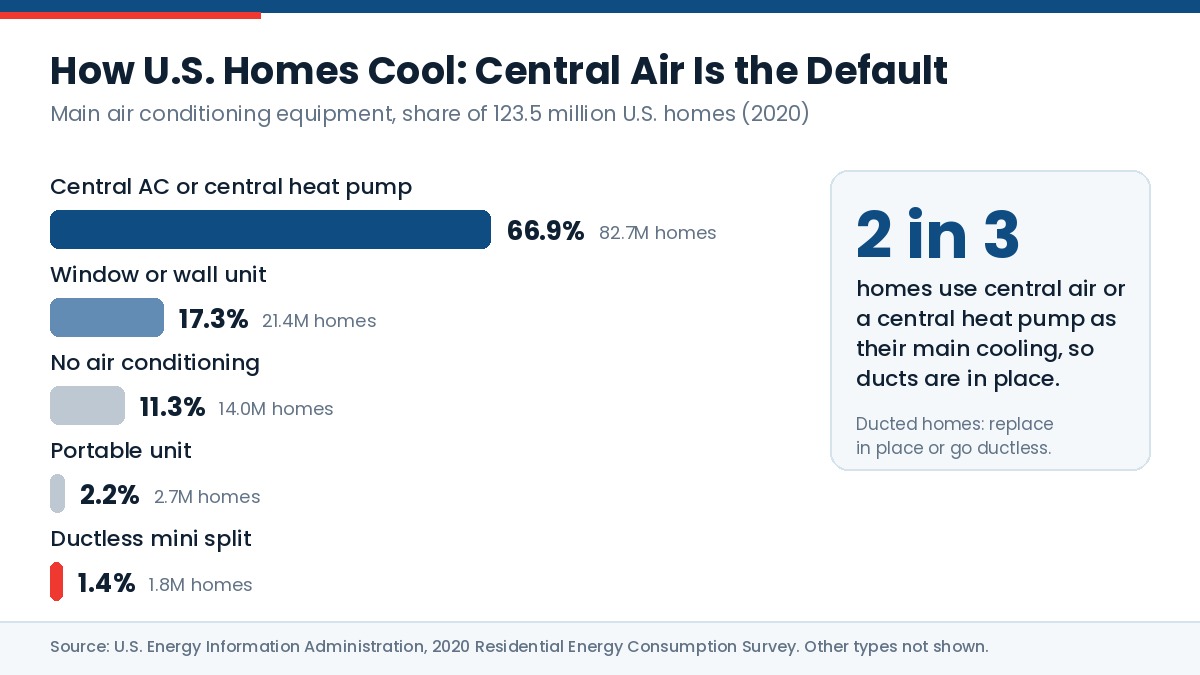
Installed price depends mostly on two things: whether ducts exist and how many rooms need their own indoor unit. Central air is the main cooling system in about two of every three U.S. homes, so replacing it in place is the most common project.
Source: U.S. Energy Information Administration, 2020 Residential Energy Consumption Survey.
Project
Central air
Mini split
Whole home, good existing ducts
$3,900 to $7,900
$8,000 to $15,000 (3 to 4 zones)
Whole home, no ducts or ducts need replacing
$7,000 to $15,000 (equipment plus new ducts)
$8,000 to $15,000 (3 to 4 zones)
Single room, addition, sunroom, or garage
Rarely practical (extending ducts often costs more than the equipment)
$3,000 to $6,000 (single zone)
These ranges blend national 2026 cost data, including Angi’s 2026 HVAC replacement cost data, with typical installed pricing for ductless systems. Brand, line-set length, electrical panel upgrades, and permit fees all move a quote.
Mini Split vs Central Air Cost for a 2,000 Square Foot Home
A 2,000 square foot home commonly needs a 3 to 4 ton central system, though a Manual J load calculation sets the true size. Ductless covers the same space with two indoor units in an open floor plan, or three to five in a divided layout.
System for a 2,000 sq ft home
Typical installed cost
Central AC, 3 ton, existing ducts
$5,500 to $8,000
Central AC with new ductwork
$9,000 to $15,000
Ductless, 2 indoor units (open layout)
$5,000 to $10,000
Ductless, 3 to 5 indoor units (divided layout)
$8,000 to $15,000
Each added indoor unit raises the price by a few thousand dollars, so placing fewer, well-sized units is the main way to hold a ductless quote down.
Where Mini Splits Cost Less Than Central Air
Room additions, sunrooms, finished garages, and attics: a single-zone unit costs $3,000 to $6,000, while extending ducts to a new space often costs more than the equipment itself.
Homes with hot-water, radiant, or baseboard heat: there are no ducts to reuse, and the Department of Energy lists these homes as an ideal fit for ductless mini split systems.
Homes with leaky or undersized ducts: repairing or replacing the ducts can cost nearly as much as the ductless equipment.
Mini Split vs Central Air Electric Bill: Which Costs Less to Run?
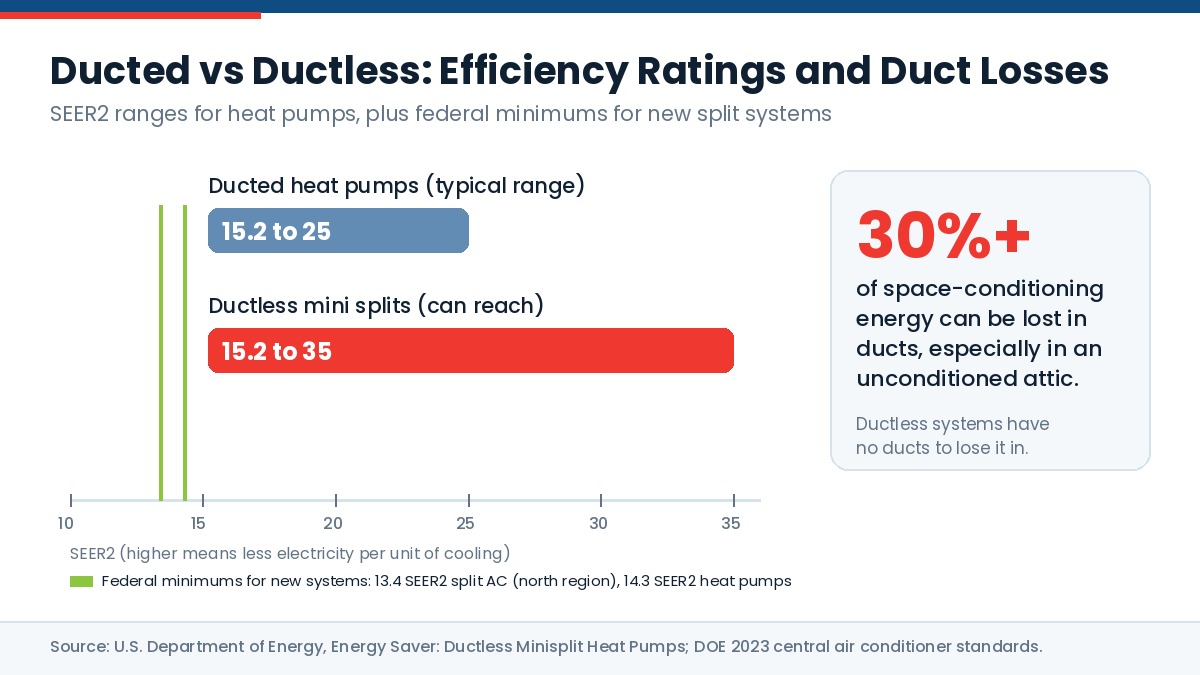
Mini splits cost less to run in most comparisons because they have no ducts and most use inverter-driven, variable-speed compressors. The Department of Energy says duct losses can account for more than 30% of energy used for space conditioning, especially when ducts run through an attic. DOE also reports that ducted heat pumps typically rate 15.2 to 25 SEER2, while ductless minisplits can reach 15.2 to 35 SEER2.
Source: U.S. Department of Energy, Energy Saver, Ductless Minisplit Heat Pumps.
Every new split-system central air conditioner installed in the northern U.S. must meet at least 13.4 SEER2, and heat pumps must meet 14.3 SEER2, under the federal 2023 efficiency standards. A higher rating pays back fastest in homes that cool for long stretches.
What Cooling Costs per Year: Central Air vs Mini Split
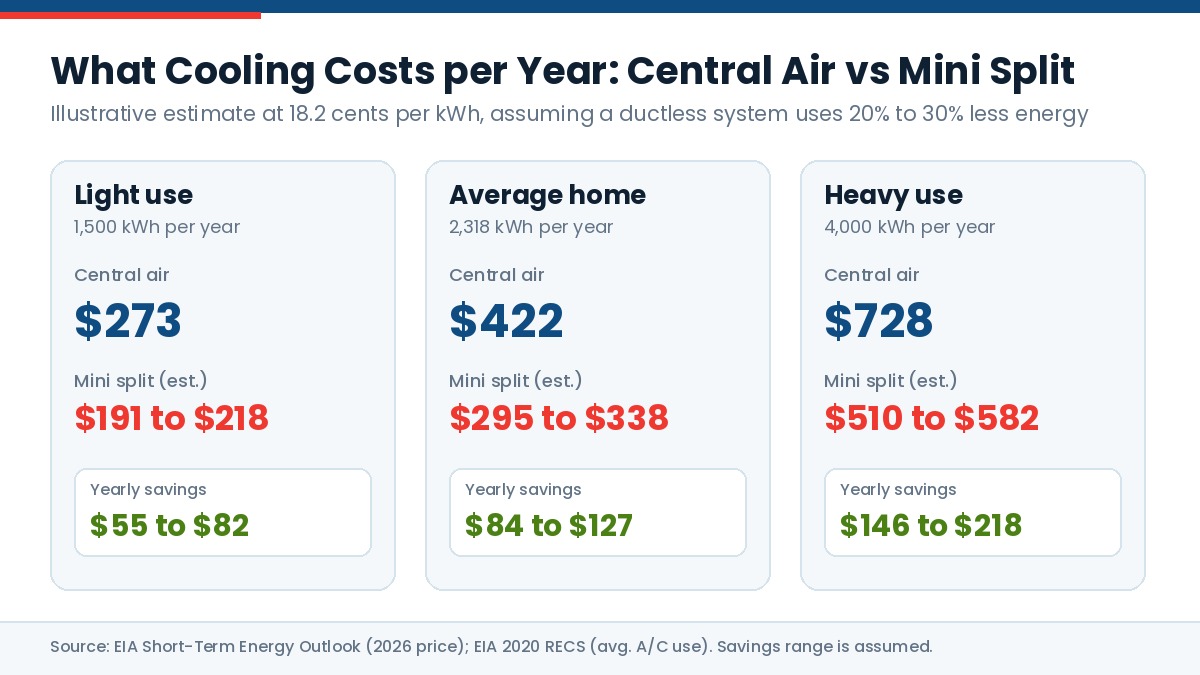
The average air-conditioned U.S. home used about 2,318 kWh for cooling in 2020, according to EIA data. At the EIA’s 2026 forecast of 18.2 cents per kWh, that works out to about $422 a year. The table assumes a ductless system uses 20% to 30% less energy, which is an estimate and not a guarantee.
Cooling use
Central air per year
Mini split per year (est.)
Yearly savings
Light (1,500 kWh)
$273
$191 to $218
$55 to $82
Average (2,318 kWh)
$422
$295 to $338
$84 to $127
Heavy (4,000 kWh)
$728
$510 to $582
$146 to $218
Source: U.S. Energy Information Administration, Short-Term Energy Outlook (2026 residential electricity price) and 2020 Residential Energy Consumption Survey (average cooling use). The 20% to 30% savings range is an assumption.
At average usage, operating savings run about $85 to $125 a year. That rarely repays a higher installation price on its own, which is why ductwork, heating needs, and system lifespan usually decide the comparison.
Mini Split Heat Pump vs Central Air With a Furnace
Most mini splits are heat pumps, so one system handles both cooling and heating. That helps in homes without gas service, in homes with a worn-out furnace and failing ducts, and in rooms the main system never heated well. A home with a working gas furnace and good ducts can add or replace central air and keep a single set of equipment. Homeowners comparing the two can look at heat pump systems that heat and cool alongside central air.
Ductwork: The Cost That Flips the Mini Split vs Central Air Decision
New ductwork commonly adds $3,000 to $7,500 to a central air project, and it is the biggest reason central air loses its price advantage. Ducts in an unconditioned attic or crawl space also lose more energy than ducts inside the conditioned space, according to DOE.
Ducts in good shape and easy to reach: central air costs less, and replacing a failing central AC keeps the existing layout.
Central air added to a home with a furnace and ducts:a new central AC installation can use the existing duct system, which keeps the price near the low end.
Leaky, undersized, or attic-run ducts: price duct repair or replacement before deciding, because it can erase central air’s savings.
No ducts at all: a mini split typically costs the same or less than building a duct system.
Maintenance, Lifespan, and 10-Year Ownership Cost
Mini Split vs Central Air Cost Over 10 Years
Ten-year cost combines installed price, cooling energy at the average-home level above, and annual service, assumed at $100 to $200 per year for each system. Heating is not included.
Home situation
Central air (10 years)
Mini split (10 years)
Good existing ducts
$9,100 to $14,100
$12,000 to $20,400
Ducts need to be built or replaced
$12,200 to $21,200
$12,000 to $20,400
With good ducts, central air wins the 10-year total by several thousand dollars. When ducts must be built, the two land in nearly the same range, with ductless slightly lower at both ends. A mini split that also replaces a furnace can shift the result further in its favor.
Maintenance and Lifespan
Mini splits: clean the indoor filters about monthly during heavy use, schedule professional service once a year, and expect roughly 15 to 20 years from a well-maintained unit.
Central air: change the filter every one to three months, schedule an annual tune-up, have ducts inspected periodically, and expect about 12 to 15 years.
Both systems last longer and cost less to run with service every year. annual HVAC tune-ups catch refrigerant leaks and clogged coils before they turn into repairs.
Rebates and Tax Credits for Mini Splits and Central Air in 2026
The federal Energy Efficient Home Improvement Credit (25C) ended for equipment installed after December 31, 2025, so 2026 installations no longer qualify. Homeowners who finished a qualifying installation by that date can still claim it on a 2025 return with IRS Form 5695, and a tax professional can confirm eligibility.
Savings in 2026 come from other sources:
Utility rebates for ENERGY STAR certified heat pumps and air conditioners, which sometimes require approval before installation.
State energy-office programs that offer incentives or low-interest financing.
Manufacturer and contractor promotions that run seasonally.
Comfort, Noise, and Zoning: What the Price Difference Buys
Zoning: each mini split zone has its own thermostat, so you can condition only the rooms in use, as the Department of Energy notes. Central air cools the whole home to one setting unless zone dampers are added.
Noise: indoor units are generally quieter than ducted air handlers, and some models list sound levels near 19 decibels on low speed.
Appearance: central air hides behind vents and grilles. Mini split indoor units are visible, and DOE acknowledges some homeowners dislike that they are not built in.
How to Size a System Before Comparing Quotes
Size drives both price and efficiency. DOE warns that oversized or incorrectly placed ductless air handlers short cycle, which wastes energy and weakens humidity control, and that an oversized system costs more to buy and operate. Ask every contractor for a Manual J load calculation instead of a square-footage guess.
Load calculation: accounts for insulation, windows, ceiling height, and sun exposure.
Room-by-room sizing: each ductless indoor unit should match the load of the room it serves.
Equal scope: compare quotes with the same coverage, SEER2 rating, and warranty terms. A full-service HVAC contractor can price central air and ductless against the same load numbers.
Mini Split vs Central Air: Which Is Cheaper for Your Home?
Your situation
Lower-cost choice
Why
Good ducts, replacing a failing central AC
Central air
Lowest installed price, reuses existing ducts
No ducts, or hot-water or baseboard heat
Mini split
Avoids $3,000 to $7,500 of new ductwork
Room addition, sunroom, garage, or finished attic
Mini split
Single zone, no duct extension
Leaky or attic-run ducts
Price both
Duct repair can erase central air’s price advantage
Long cooling season and high summer bills
Mini split
Larger yearly savings from efficiency
Working gas furnace in good condition
Central air
Keeps one system and the existing ducts
Furnace and AC both near end of life
Price a heat pump
One system handles heating and cooling
Frequently Asked Questions About Mini Split vs Central Air Cost
Is a mini split cheaper than central air?
It depends on the ducts. In a home with good ductwork, central air is cheaper to install, typically $3,900 to $7,900 versus $8,000 to $15,000 for a whole-home mini split. In a home with no ducts or failing ducts, a mini split costs about the same or less than building a duct system, and it usually costs less to run.
How much does a mini split cost for a 2,000 square foot house?
Typically $5,000 to $10,000 for two indoor units in an open floor plan and $8,000 to $15,000 for three to five indoor units in a divided layout. A load calculation and the number of rooms that need their own unit set the final price.
Is it cheaper to run a mini split or central air?
Mini splits are usually cheaper to run because they have no ducts and most use variable-speed compressors. The U.S. Department of Energy says duct losses can exceed 30% of space-conditioning energy. At an average cooling load of about 2,318 kWh a year and 18.2 cents per kWh, a ductless system that uses 20% to 30% less energy would save roughly $85 to $125 a year.
Can a mini split replace central air?
Yes, in many homes. A multi-zone ductless system with an indoor unit in each main living area can cool and heat the whole house, and a heat pump mini split can replace the furnace too. Homes with many small rooms or closed floor plans need more indoor units, which raises the price.
How many mini split units does a 2,000 square foot home need?
Two indoor units can cover an open floor plan, while a divided layout often needs three to five. Each bedroom or closed-off room usually needs its own unit unless the doors stay open. A Manual J load calculation confirms the right number and sizes.
Do mini splits qualify for a federal tax credit in 2026?
No. The federal Energy Efficient Home Improvement Credit (25C) ended for equipment installed after December 31, 2025. Installations finished by that date can still be claimed on a 2025 return. Utility rebates and state programs may still apply, so check with your utility before scheduling work.
Which lasts longer, a mini split or central air?
Installers commonly cite 15 to 20 years for a well-maintained mini split and about 12 to 15 years for central air. Annual service and clean filters matter more than the system type.
Is it cheaper to add central air or a mini split to a home without ducts?
A mini split is usually cheaper. Central air needs a full duct system, which commonly adds $3,000 to $7,500, while a mini split needs only a small wall opening for the line set.
Get Both Options Priced for Your Home
The right answer depends on your ducts, your layout, and how long you plan to stay, so an on-site look beats any national average. Schneider Plumbing, Heating & Air Conditioning is a family-owned company serving homeowners since 1948, and its technicians can inspect the ducts, run the load calculation, and price central air and ductless side by side. Contact the team to request an estimate for your home.
When your cooling system starts to fail, one of the first questions homeowners ask is: what is the AC replacement cost? The answer depends on several factors, from the size and type of your unit to efficiency ratings, ductwork condition, and brand. Understanding these details will help you budget wisely, compare quotes accurately, and decide when it makes more sense to invest in a new system rather than continuing to repair the old one.
AC Replacement Cost: Typical Price Range and What Affects It
On average, homeowners across the U.S. can expect to pay between $4,500 and $12,000 for a full central air conditioning replacement. The wide range comes from differences in system capacity, efficiency ratings, installation complexity, and regional labor rates. High-end systems with advanced efficiency or specialized installation requirements can exceed $15,000.
Major Factors That Influence AC Replacement Cost
System Size (Tonnage): Air conditioners are sized in tons, which refers to cooling capacity. Most homes require systems between 2 and 5 tons. Each additional ton increases cost significantly, and oversizing or undersizing your unit leads to efficiency problems and premature wear.
Efficiency Ratings (SEER2): Today’s air conditioners must meet updated SEER2 standards. Units with higher ratings save money on electricity but cost more upfront. A 14.3 SEER2 system will be cheaper to purchase than a 20+ SEER2 unit, but it will not deliver the same long-term energy savings.
Ductwork Condition: If existing ductwork is leaky, undersized, or damaged, repairs or replacement will add thousands to the total. Well-maintained ducts keep installation costs lower and help the new system perform at its rated efficiency.
Brand and Features: Premium brands like Trane, Carrier, and Lennox carry higher price tags but are valued for durability, technology, and warranty coverage. Budget-friendly brands can still perform well, but may offer fewer advanced features or shorter warranties.
Installation Complexity: Multi-story homes, tight crawl spaces, or systems requiring electrical panel upgrades will increase labor costs. Always factor local permit fees into your budget as well.
AC Replacement Cost by System Type
Not all replacements are the same. The type of cooling system you choose has a significant impact on what you will pay.
System Type
Typical Cost Range
Best For
Central AC
$5,000 to $12,000
Homes with existing ductwork
Ductless Mini Split
$3,000 to $10,000 per zone
Homes without ducts or room additions
Heat Pump
$6,000 to $14,000
Year-round heating and cooling
Packaged System
$7,000 to $12,000
Homes without basements or attics
If your home lacks ductwork or you are looking to cool a specific addition or zone, a ductless mini split installation is worth comparing alongside traditional central air. For a detailed breakdown of how the two systems compare on cost and efficiency, see our post on mini split vs central air cost.
When to Repair vs Replace Your AC
Deciding between repair and replacement is one of the most common calls homeowners face during a hot Indiana summer. Here are the clearest signals that replacement is the smarter investment.
Age of System: Most central air conditioners last 10 to 15 years. Beyond that point, efficiency drops steadily and major component failures become more frequent.
Frequent Breakdowns: If you are calling for repairs multiple times in a single cooling season, the cumulative repair costs are likely approaching replacement territory.
Rising Energy Bills: An aging system loses efficiency over time. If your summer electric bills have climbed without a clear explanation, the AC is likely the culprit.
Uneven Cooling or Excess Humidity: These are signs of declining system performance that repairs often cannot fix long-term.
R-22 Refrigerant: Systems still running on R-22 (phased out in 2020) are expensive to service and increasingly difficult to maintain. Replacement is almost always the right call.
AC Replacement Cost vs Repair: The Break-Even Calculation
A widely used rule of thumb in the HVAC industry is the $5,000 Rule. Multiply the age of your AC unit by the estimated repair cost. If the result exceeds $5,000, replacement is generally the more financially sound choice.
A 12-year-old unit needs a $600 repair: 12 x $600 = $7,200 — replacement makes sense.
A 4-year-old unit needs a $600 repair: 4 x $600 = $2,400 — repair is the better call.
This calculation is a starting point, not a final answer. The condition of your ductwork, the efficiency of your current system, and the availability of rebates on new equipment all factor into the real break-even point. For a deeper look at the repair versus replacement decision, see our full comparison of AC repair vs replacement cost. If your system still has useful life left, professional AC repair in Seymour is often the more economical short-term option.
Hidden AC Replacement Cost Add-Ons to Budget For
The cost of the unit and labor are just the start. Depending on your home’s setup, several additional costs may apply.
Thermostat Upgrades: Installing a programmable or smart thermostat typically adds $200 to $500 to the project cost. A connected thermostat helps maximize efficiency on your new system from day one.
Ductwork Repairs or Replacement: Leaky or aging ducts can add $2,000 to $5,000 or more to the total. Sealing or replacing problem ductwork before installation ensures your new system performs at its rated efficiency.
Permits and Inspections: Most Indiana municipalities require permits for AC replacement. Budget $150 to $500 in permit fees depending on your county.
Electrical Upgrades: If your home’s electrical panel cannot support the new system, upgrades can add $500 to $2,000 to the project.
Refrigerant Line Replacement: Older line sets may not be compatible with modern refrigerants. Replacement adds $200 to $600 depending on run length.
How to Choose the Right AC System for Your Home
Picking the right replacement system is about more than finding the lowest price. The wrong unit, even if installed correctly, will underperform, cost more to operate, and wear out faster than it should.
Right-Sizing Your AC Replacement
Proper sizing is critical. An oversized unit will short-cycle, meaning it turns on and off too frequently, which reduces humidity control and puts unnecessary wear on the compressor. An undersized unit runs constantly and struggles to keep up on the hottest days. A Manual J load calculation is the industry standard method for determining exactly what your home needs based on square footage, insulation, window placement, and local climate data.
1,000 to 1,500 sq ft: Typically 2 to 2.5 tons
1,500 to 2,000 sq ft: Typically 2.5 to 3 tons
2,000 to 2,500 sq ft: Typically 3 to 3.5 tons
2,500 to 3,500 sq ft: Typically 4 to 5 tons
These are general starting points. Indiana’s heat and humidity make accurate load calculations especially important for achieving comfortable, efficient cooling throughout the summer.
What SEER2 Rating Should You Choose?
Higher SEER2 ratings mean lower operating costs but higher upfront prices. For most Indiana homeowners running their AC heavily from June through August, a 16 to 18 SEER2 system hits the sweet spot between upfront investment and long-term savings. If you plan to stay in your home for 10 or more years, a 20+ SEER2 system can pay for itself through energy savings. Stay current on minimum efficiency standards at EnergyStar.gov.
Rebates, Tax Credits, and Financing That Reduce Your AC Replacement Cost
The sticker price on a new AC system is rarely what you end up paying. Several programs can meaningfully reduce your out-of-pocket cost.
Federal Tax Credit (25C): Qualifying high-efficiency central air conditioners and heat pumps may be eligible for a federal tax credit of up to $600 for AC units and up to $2,000 for heat pumps under the Inflation Reduction Act. Check current requirements at EnergyStar.gov.
Indiana Utility Rebates: Local utilities throughout Jackson and Jennings County occasionally offer rebates for high-efficiency HVAC upgrades. Contact your utility provider before scheduling installation to ask what is currently available.
Manufacturer Rebates: Many HVAC brands run seasonal promotions that can shave hundreds off the equipment cost. Ask your contractor which rebates are currently available for the systems they carry.
Financing Options: Many HVAC contractors offer in-house or third-party financing, allowing you to spread payments over 12 to 60 months. Low or no-interest promotional periods are common for qualified buyers.
Warranties: Manufacturer warranties typically cover 10 years on parts when registered after installation. Labor warranties vary by contractor. Always confirm warranty terms before signing a contract.
How Long Does AC Replacement Take?
For a standard central air replacement in a home with existing ductwork and no electrical upgrades needed, most installations are completed in 4 to 8 hours. More complex projects involving ductwork modifications, electrical upgrades, or multi-zone systems may take a full day or longer. A reputable contractor will give you a clear timeline during the quote process and keep you informed of any delays.
Staying ahead of your system’s end of life with regular HVAC maintenance in Seymour can extend equipment life and give you more time to plan for replacement on your schedule rather than in the middle of a heat wave.
Frequently Asked Questions: AC Replacement Cost
How much does AC replacement cost for an average home in Indiana?
Most Indiana homeowners pay between $5,000 and $10,000 for a central air conditioning replacement, including equipment and installation. Homes that need ductwork repairs or electrical upgrades will fall toward the higher end of that range.
Is it worth replacing a 10-year-old AC unit?
It depends on the condition of the unit and the cost of the repair needed. A 10-year-old system is approaching the end of its average lifespan. Apply the $5,000 Rule: multiply the repair cost by the system’s age. If the result exceeds $5,000, replacement typically makes more financial sense.
What is the most energy-efficient AC system available?
Variable-speed central air conditioners and ductless mini splits with SEER2 ratings of 20 or higher represent the most efficient options currently available. Heat pumps with high HSPF2 ratings are also worth considering for homeowners who want efficient year-round comfort from a single system. Explore heat pump installation in Seymour as an alternative to a straight AC replacement.
Can I get a tax credit on AC replacement?
Yes. Qualifying central air systems may be eligible for a federal tax credit of up to $600 under the 25C provisions of the Inflation Reduction Act. Heat pump replacements may qualify for up to $2,000. Check EnergyStar.gov for current eligibility requirements and consult a tax professional about your specific situation.
How long does a new AC unit last?
A properly sized and professionally installed central air conditioner should last 15 to 20 years with annual maintenance. Neglected systems or those improperly sized for the home tend to fail earlier. Scheduling annual tune-ups with a trusted HVAC company in Seymour is the single best way to protect your investment.
What size AC do I need for my home?
Sizing depends on your home’s square footage, insulation, number of windows, ceiling height, and local climate. A Manual J load calculation performed by a licensed HVAC technician is the only accurate way to determine the correct tonnage. Guessing or going by square footage alone often results in an over- or undersized system.
Schedule Your AC Replacement Consultation
Schneider Plumbing, Heating & Air Conditioning has served homeowners throughout Jackson and Jennings County for over 70 years. Whether you are weighing repair versus replacement, comparing system types, or ready to move forward, our team will walk you through your options honestly and help you take full advantage of available rebates and financing. Learn more about what to expect with AC replacement in Seymour or reach out to get started today.
Contact us for a no-obligation quote and start planning for a cooler, more efficient home.
When it comes to thermostat installation, homeowners are often faced with a common question: Should you tackle the job yourself or call in a professional? On the surface, replacing or installing a thermostat may seem straightforward—a small device mounted on the wall that connects to your HVAC system. However, what’s hidden behind the wall can make the difference between a smooth upgrade and a costly, frustrating mistake.
While DIY installation might seem appealing for those who enjoy hands-on projects, professional installation offers peace of mind, efficiency, and long-term reliability—especially as modern thermostats grow more sophisticated. Let’s explore the pros and cons of each approach, common mistakes to avoid, and why hiring a technician often comes out on top.
Pros and Cons of DIY Installation
Many homeowners are drawn to the idea of installing a thermostat themselves because it can save on upfront labor costs. With the right tools, a YouTube tutorial, and some basic knowledge, a confident DIYer might complete the project in an hour or two. But there’s more to consider than just potential savings.
Benefits of DIY Installation
Lower Initial Cost – You avoid labor charges, which can range from $75 to $200 depending on your location and the complexity of the system.
Immediate Control – You can replace the thermostat at your convenience without scheduling an appointment.
Satisfaction and Learning – For the handy homeowner, there’s pride in successfully completing a home improvement task.
Risks and Drawbacks of DIY Installation
Electrical Safety Hazards – Thermostats connect directly to your home’s HVAC control wiring, and incorrect wiring can short-circuit your system, damage the thermostat, or even pose a fire risk.
Compatibility Errors – HVAC systems vary widely, and not every thermostat works with every system. Choosing the wrong one can mean wasted money and a system that won’t operate properly.
Loss of Warranty – Many thermostat and HVAC manufacturers require professional installation to maintain warranties. DIY work might void coverage.
Hidden Complexity – While older thermostats were simple, modern units—especially smart thermostats—often require software setup, Wi-Fi connectivity, and sometimes a common wire (C-wire) installation.
When to Hire a Technician
Professional HVAC technicians bring not only the right tools but also years of experience and training. This expertise ensures your thermostat is compatible, installed correctly, and optimized for your comfort and efficiency needs.
Wiring and Compatibility Issues
One of the most common pitfalls in DIY thermostat installation is wiring. HVAC systems can operate on low voltage, high voltage, or even millivolt systems, and wiring configurations vary significantly. Miswiring can cause your heating or cooling to malfunction—or stop working altogether.
A professional technician will:
Verify Compatibility – Ensuring the thermostat matches your HVAC system type (single-stage, multi-stage, heat pump, or zoned system).
Handle C-Wire Installation – Many modern thermostats require a C-wire to provide continuous power. If your current setup lacks one, a pro can run new wiring safely.
Check System Load – Some systems need relays or adapters to work with advanced thermostats.
Benefits of Hiring a Pro
Expert Troubleshooting – If something isn’t working, technicians can quickly diagnose the issue.
Safe Handling – HVAC professionals understand electrical safety and building codes.
Optimal Performance – Proper calibration ensures your HVAC system runs efficiently, extending its lifespan and reducing energy costs.
Smart Thermostat Considerations
The rise of smart thermostats—like the Nest, Ecobee, and Honeywell Lyric—has changed the thermostat landscape. These devices offer energy-saving features, remote access, and detailed usage reports, but they also introduce more complexity.
Features of Modern Thermostats
Smart thermostats often include:
Learning Algorithms – They adapt to your schedule automatically over time.
Geofencing – Adjusts temperature based on your smartphone’s location.
Integration with Smart Homes – Works with voice assistants, security systems, and lighting controls.
Energy Usage Reports – Helps identify ways to save on utility bills.
While these features are appealing, setup can involve connecting to your home’s Wi-Fi, creating user accounts, linking to other smart devices, and navigating app-based controls. A technician familiar with these systems can streamline setup, ensure all features work correctly, and even guide you through operation.
Cost Comparison and Savings
When deciding between DIY and professional thermostat installation, it’s tempting to focus only on the upfront cost. But the total value goes beyond initial expenses.
DIY Installation
Thermostat cost: $50–$300 depending on features.
Labor: $0 if self-installed.
Potential hidden costs: Damaged HVAC control board ($200–$600), hiring a pro later to fix mistakes, voided warranties.
Professional Installation
Thermostat cost: Same as DIY, often purchased through the technician or brought by the homeowner.
Labor: $75–$200 on average.
Added value: Ensures warranty protection, optimal operation, reduced energy costs over time.
In many cases, professional installation pays for itself by preventing mistakes and maximizing efficiency, especially with high-end smart thermostats.
Common DIY Mistakes That Can Cost You
Even the most confident DIYers can stumble when it comes to thermostat installation. Some of the most frequent errors include:
Not turning off the power before starting work.
Incorrect wiring leading to short circuits.
Installing in the wrong location, such as near a draft, heat source, or direct sunlight, which can throw off temperature readings.
Skipping system configuration so the thermostat doesn’t communicate properly with the HVAC system.
Each of these mistakes can result in higher energy bills, equipment damage, or the need for emergency repairs.
Why Professional Installation is Worth It
While DIY thermostat installation might look simple on paper, the real-world complexity can quickly outweigh the initial cost savings. A professional brings:
Peace of mind knowing your HVAC system will run safely and efficiently.
Time savings by completing the job quickly and correctly.
Expert advice on the best thermostat for your needs and budget.
In short, when it comes to something as central to your home’s comfort and efficiency as the thermostat, hiring a pro is a wise investment.
Final Thoughts
A thermostat might be small, but it plays a big role in your home’s comfort and energy efficiency. While DIY installation may work for a select group of handy homeowners, most people benefit more from professional service, especially with today’s advanced smart thermostats and varied HVAC systems.
Contact Us Today
If you’re considering upgrading your thermostat, trust the experts at Schneider Plumbing, Heating & Air Conditioning. For over 70 years, we’ve proudly served Jackson and Jennings County, helping our neighbors enjoy comfortable, efficient homes. As a family-owned HVAC company, we’re committed to delivering the highest level of service, whether you need a simple upgrade or a complex smart thermostat installation.
Contact us today to schedule your professional thermostat installation and enjoy peace of mind knowing the job will be done right the first time.
If you own a heat pump, you already know it is one of the most efficient ways to heat and cool your home year-round. But even the most advanced systems need regular care to keep performing at their best. Heat pump maintenance is the key to ensuring your unit runs smoothly, avoids costly breakdowns, and lasts for years to come. Neglecting maintenance can lead to efficiency losses, higher energy bills, and premature system failure, all of which are avoidable with the right care schedule.
Why Regular Heat Pump Maintenance Matters
Your heat pump is a workhorse. Unlike a traditional furnace or air conditioner that only runs during one season, a heat pump provides both heating and cooling, often operating nearly year-round. That near-constant use means it experiences more wear and tear than single-function systems, and more opportunity for small problems to grow into expensive ones.
When maintenance gets skipped, minor issues like a dirty filter or slightly low refrigerant can snowball into major failures. Here is what consistent service protects:
Energy Efficiency: Dust, debris, and worn parts force your system to work harder and consume more electricity to deliver the same comfort.
System Longevity: Well-maintained heat pumps regularly reach 15 years or more. Neglected systems often fail years ahead of schedule.
Indoor Comfort: Proper maintenance keeps your heat pump maintaining even temperatures and reliable humidity control through every season.
Warranty Protection: Many manufacturers require documented proof of professional maintenance to honor warranty claims. Skipping service can void coverage exactly when you need it most.
Lower Repair Costs: Catching small problems early prevents them from becoming large, expensive emergencies.
How Often Should You Schedule Heat Pump Maintenance?
The short answer: twice a year. Because heat pumps run through both the heating and cooling seasons, they need more frequent professional attention than seasonal-only systems.
The Recommended Heat Pump Maintenance Schedule
Task
Frequency
Who Does It
Professional tune-up
Twice per year (spring and fall)
Licensed HVAC technician
Filter cleaning or replacement
Every 1 to 3 months
Homeowner
Outdoor unit inspection and clearing
Monthly
Homeowner
Thermostat check and calibration
Seasonally
Homeowner or technician
Coil cleaning and refrigerant check
Annually (included in tune-up)
Licensed HVAC technician
Why Twice a Year for Heat Pump Maintenance?
Unlike a furnace that earns a single pre-winter tune-up, your heat pump works double duty all year. A spring visit preps it for long cooling cycles during Indiana’s hot, humid summers. A fall visit ensures reliable heat production before cold weather sets in. Skipping either appointment leaves your system vulnerable during peak demand, when breakdowns are most disruptive and service appointments are hardest to get.
Scheduling both visits in advance through a Schneider service agreement is the easiest way to stay on track without having to remember to call each season.
What a Professional Heat Pump Tune-Up Includes
A professional maintenance visit is far more thorough than a quick visual inspection. Technicians inspect, clean, test, and adjust key components to ensure the system is operating as efficiently and safely as possible.
Filter Service and Refrigerant Inspection
A clogged air filter is one of the leading causes of reduced airflow and elevated energy consumption. During your tune-up, the technician will clean or replace the filter and verify airflow is unrestricted throughout the system.
Refrigerant levels are checked and corrected as needed. Too little refrigerant prevents effective heat transfer and can damage the compressor over time. Too much creates dangerous pressure levels that stress components and shorten system life.
Electrical and Mechanical Component Checks
The technician will test and tighten all electrical connections, inspect capacitors, contactors, and relays, lubricate moving parts, and verify that safety controls and emergency shutoffs function correctly. Loose or corroded connections are a common cause of inefficient cycling and, in worse cases, electrical fires.
Coil Cleaning and Heat Transfer Efficiency
Both the indoor evaporator coil and the outdoor condenser coil are inspected and cleaned during a professional heat pump maintenance visit. Dirty coils significantly reduce heat transfer efficiency, forcing the system to run longer cycles and consume more energy to reach the same result.
Defrost Cycle Verification
Indiana winters regularly push temperatures low enough to trigger ice buildup on the outdoor unit. Heat pumps are designed with a defrost cycle to handle this automatically, but a malfunctioning defrost board or sensor can allow ice to accumulate unchecked, damaging the unit. Your technician will verify the defrost cycle engages and completes properly before cold weather arrives.
Thermostat Calibration
A thermostat that reads even a couple of degrees off can cause the system to overshoot or undershoot your comfort targets, wasting energy and creating uneven temperatures. If you are still running a basic thermostat, this is also a good time to discuss the benefits of a smart thermostat upgrade, which can further reduce energy consumption by learning your schedule and adjusting automatically.
What Homeowners Can Do Between Professional Visits
Professional tune-ups are essential, but what you do between appointments also matters. These simple habits extend the life of your system and keep it running efficiently month to month.
Change filters on schedule: Every 1 to 3 months depending on household factors like pets, allergies, and local dust levels. A clogged filter is one of the easiest problems to prevent and one of the most damaging to ignore.
Keep the outdoor unit clear: Maintain at least 18 to 24 inches of clearance around the unit. Remove leaves, grass clippings, and debris regularly. In winter, clear snow and ice buildup carefully without bending the fins.
Clean vents and registers: Blocked supply and return vents restrict airflow and force the system to compensate, consuming more energy and creating uneven comfort.
Monitor thermostat performance: If you notice the system cycling on and off more frequently than usual or struggling to reach the set temperature, that is a signal worth investigating before it becomes a larger repair.
Listen for changes: Unusual sounds like rattling, grinding, or squealing are early warning signs. Catching them early typically means a minor fix rather than a major repair.
Signs Your Heat Pump Needs More Than Routine Maintenance
Sometimes a tune-up reveals a problem that requires more than standard service. Watch for these signs between appointments, as they indicate it is time to call for a repair evaluation rather than waiting for your next scheduled visit:
The system runs constantly but cannot reach the target temperature
Ice forms on the outdoor unit outside of normal defrost cycles
Unusual noises persist after a recent service visit
Energy bills spike without a change in usage habits
The system blows air that is not noticeably warmer or cooler than room temperature
Refrigerant lines show visible frost or the unit emits a chemical odor
If any of these apply to your system, heat pump repair in Seymour should be scheduled promptly. Delaying often turns a straightforward fix into a more costly one.
The Cost of Skipping Heat Pump Maintenance
Skipping a service appointment when the system seems to be working is a common and costly mistake. Here is what you are risking:
Higher monthly energy bills: Even a modest efficiency loss from dirty coils or low refrigerant can add hundreds of dollars annually to your utility costs.
Emergency repair costs: Repairs needed during peak summer or winter demand are more expensive and often involve longer wait times for parts and service.
Shortened system life: A heat pump that should last 15 years may fail at 8 to 10 without consistent care, forcing an early replacement investment.
Voided warranties: Most manufacturers require documented proof of biannual professional maintenance to honor parts and labor warranty claims.
The cost of a professional tune-up is modest compared to any of these outcomes. Viewed as a recurring investment, routine HVAC maintenance in Seymour consistently delivers a positive return.
Heat Pump Maintenance vs Maintenance Plan: Which Makes More Sense?
Scheduling individual tune-up appointments each spring and fall works, but a maintenance plan takes the guesswork out entirely. With a service agreement, your visits are scheduled automatically, you receive priority booking during busy seasons, and many plans include discounts on parts and labor if a repair is needed during the covered period.
For homeowners who want consistent protection without having to remember to call twice a year, a Schneider service agreement is worth a close look. It is the simplest way to ensure your heat pump never misses a scheduled service.
Indiana Climate and Your Heat Pump: What Makes This Area Different
Heat pumps in southern Indiana face demands that are tougher than many other regions. Jackson and Jennings County summers bring heat and humidity that push cooling systems hard from June through August. Winters, while not extreme, regularly dip into temperatures where heat pump efficiency drops and backup heat sources may engage.
This climate reality makes the twice-yearly maintenance schedule even more important here than in milder regions. Spring service after a cold winter ensures the refrigerant, coils, and electrical components are in full working order before the summer cooling load begins. Fall service after months of cooling duty catches wear before the heating season demands begin. The U.S. Department of Energy recommends professional annual or biannual service for all heat pump systems, a recommendation that makes particular sense in climates with distinct heating and cooling seasons like Indiana’s.
If you are still weighing whether a heat pump is the right long-term investment for your home, our overview of heat pump installation in Seymour covers what to expect from the process and which system configurations work best in this area.
Frequently Asked Questions: Heat Pump Maintenance
How often should heat pump maintenance be scheduled?
Twice per year is the professional standard for heat pumps. Schedule one visit in spring before the cooling season begins and one in fall before heating season. Because heat pumps run year-round, they need more frequent service than furnaces or central air conditioners that only operate one season.
What happens if I skip heat pump maintenance?
Skipping maintenance increases the risk of reduced efficiency, higher energy bills, unexpected breakdowns, and a shorter overall system lifespan. Many manufacturers also require documented professional service to keep warranty coverage valid. A single missed tune-up may seem harmless, but the cumulative effect of inconsistent maintenance is measurable over time.
How long does a heat pump tune-up take?
Most professional heat pump maintenance visits take between 60 and 90 minutes for a standard system. More complex systems or units that have not been serviced in more than a year may take longer if additional cleaning or adjustments are needed.
Can I do heat pump maintenance myself?
Homeowners can handle filter changes, outdoor unit clearing, and basic visual checks. However, tasks like refrigerant level checks, coil cleaning, electrical testing, and defrost cycle verification require licensed technicians with the proper tools and certifications. Attempting refrigerant work without an EPA 608 certification is illegal.
How do I know if my heat pump needs repairs instead of just maintenance?
If your system is struggling to reach temperature, making unusual noises, showing ice buildup outside of normal defrost cycles, or driving up energy bills without explanation, those are signals for repair rather than routine maintenance. Schedule a diagnostic visit with our team for heat pump repair in Seymour rather than waiting for the next tune-up date.
Is a maintenance plan worth it for a heat pump?
For most homeowners, yes. A maintenance plan removes the burden of remembering to call twice a year, guarantees priority scheduling during busy seasons, and often includes repair discounts that more than offset the plan cost. Review the Schneider service agreement options to find the right fit for your home.
Keep Your Heat Pump Ready for Every Season
Your heat pump works year-round to keep your home comfortable, and it deserves consistent care in return. Two professional visits per year, combined with basic homeowner upkeep between appointments, is all it takes to protect your investment and avoid the stress of an unexpected breakdown.
Schneider Plumbing, Heating & Air Conditioning has served homeowners throughout Jackson and Jennings County for over 70 years. Our licensed technicians know heat pump systems inside and out and will make sure yours is ready for whatever the Indiana weather brings next.
Contact us today to schedule your next heat pump maintenance visit or to ask about our service agreement options.
Toilet issues can range from mildly annoying to outright disruptive, and knowing when to call for toilet repair services can save you time, money, and a major mess. While some minor toilet troubles can be fixed with a plunger or wrench, others signal deeper issues requiring a professional plumber’s expertise.
Common Toilet Issues That Need Repair
Toilets are among the most used plumbing fixtures in any home, and wear and tear is inevitable. While some issues are purely cosmetic or temporarily inconvenient, others may indicate serious plumbing problems.
Constant Running or Leaking
One of the most common issues homeowners face is a toilet that runs continuously or leaks around the base or tank. A constantly running toilet can waste hundreds of gallons of water each month, driving up your utility bill and impacting your environmental footprint. The usual culprits include:
Worn-out flapper: This rubber piece can degrade over time, failing to create a proper seal.
Faulty fill valve: If it’s not shutting off correctly, the tank will keep refilling.
Chain or handle issues: A kinked chain or a stuck handle may prevent the flapper from closing fully.
In some cases, these components can be replaced easily. However, if you’ve tried swapping them out and the toilet still runs, more complex internal tank problems or water pressure issues may need a professional’s diagnosis.
Leaking toilets are a different beast. Water pooling around the base could signal:
A cracked wax seal between the toilet and floor
A loose flange
A hairline crack in the bowl or tank
Leaks like these can lead to mold, mildew, and subfloor damage, so it’s crucial to call a plumber as soon as you notice them.
Cracked Porcelain and Clogs
Cracks in the porcelain bowl or tank may start out small but can quickly escalate. A hairline crack can lead to slow leaks or a sudden catastrophic failure. These cracks often appear due to:
Age and wear
Impact (dropping something heavy on the toilet)
Extreme temperature changes
Cracks are not repairable. Once the integrity of the porcelain is compromised, replacement is the only safe option—and it’s definitely not a DIY task.
Clogs, on the other hand, are common but vary in severity. A plunger can often clear minor clogs from toilet paper or organic material. However, persistent or recurring clogs may indicate:
Something lodged in the trap (e.g., toys, wipes, hygiene products)
Hard water buildup
Tree roots invading the sewer line
If you find yourself plunging more than once a week or if other drains in your home are backing up simultaneously, it’s time to call in a professional plumber who can inspect your lines and use tools like augers or hydro-jetting.
Replacing Valves and Seals
Your toilet relies on a variety of valves and seals to function correctly. Over time, these parts can wear out due to:
Hard water minerals
Age
Improper installation
Key parts that may need a professional replacement include:
Fill valve: Controls the water level in the tank.
Flush valve: Releases water from the tank into the bowl.
Wax seal: Provides a watertight barrier between the base of the toilet and the floor.
Tank-to-bowl gasket: Prevents leaks where the two parts connect.
Replacing these parts may seem simple, but it often involves turning off the water supply, draining the tank, disconnecting plumbing lines, and reseating or realigning components properly. One wrong move could lead to leaks or even water damage.
DIY vs. Professional Toilet Fixes
There’s nothing wrong with being a handy homeowner—many toilet issues can be fixed with a few basic tools and parts from the hardware store. But how do you know when it’s time to stop DIYing and call in the professionals?
When DIY Might Be Enough
Replacing a worn-out flapper or handle
Tightening a loose toilet seat
Adjusting the chain or float in the tank
Plunging a minor clog
These repairs are generally low-risk, cost-effective, and require minimal technical knowledge. Many online tutorials can walk you through the steps.
When to Call for Toilet Repair Services
If you encounter any of the following issues, it’s time to bring in a licensed plumber:
Water pooling around the base or leaking from the tank
Cracks in the bowl or tank
Continuous running despite replacing basic parts
Foul odors coming from the base (could indicate a sewer gas leak)
Backflow or sewer line problems
Persistent or recurring clogs
Weak flushing or strange sounds during flushing
These signs often point to deeper plumbing or structural issues that DIY repairs can’t address. Delaying professional service can lead to increased water bills, property damage, and costly emergency repairs.
Cost and Process of Toilet Repairs
Understanding what to expect during a toilet repair call can help you make informed decisions. Let’s break down both the cost factors and the typical process involved when you contact professionals like Schneider Plumbing, Heating & Air Conditioning.
What Affects the Cost?
Several variables influence the total cost of toilet repairs:
Type of issue: Minor repairs like flapper replacement may cost under $100, while more complex issues like toilet replacement or sewer line repair can range from $200 to $800+.
Parts required: Some replacement parts are inexpensive, while others—such as tank internals or wax seals—require more time and expertise to install.
Extent of damage: Water damage from a leak or a cracked bowl could mean additional remediation work.
Urgency: Emergency or after-hours calls often come with a premium.
Getting a professional inspection and a transparent quote upfront will help prevent any surprises.
What to Expect During a Service Call
Inspection and Diagnosis
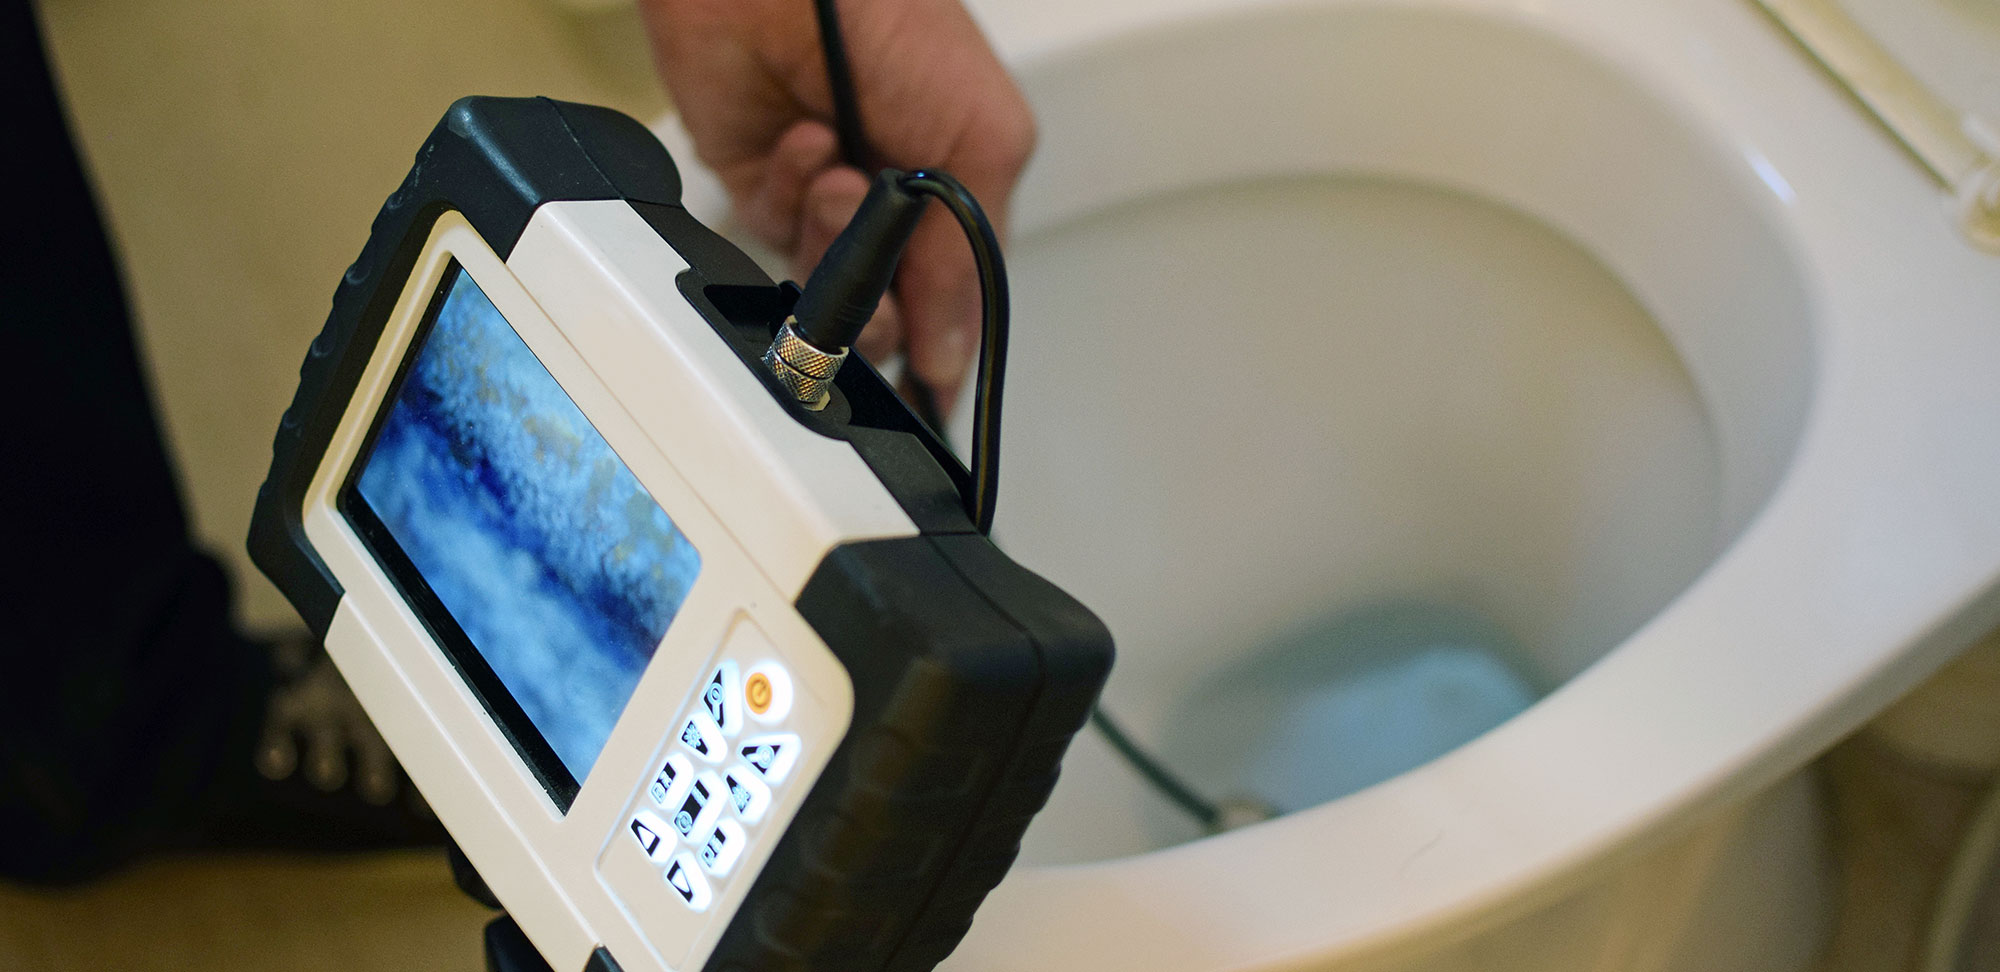
A licensed plumber will examine the toilet and the surrounding area to identify the root cause of the issue. Depending on the problem, they may use dye tests, leak detectors, or inspection cameras.
Quote and Explanation
Once the issue is diagnosed, they’ll explain the problem, outline the needed repair or replacement, and provide an upfront estimate.
Repair or Replacement
Depending on the severity, the plumber may either complete the repair on the spot or schedule a follow-up visit if special parts or tools are required.
Testing and Cleanup
After completing the repair, the technician will test the toilet to ensure it’s functioning properly and clean up the work area.
Working with a reputable company like Schneider Plumbing, Heating & Air Conditioning ensures a professional, respectful experience from start to finish.
Why Choose Schneider Plumbing, Heating & Air Conditioning?
With over 70 years of experience serving Jackson and Jennings County, Schneider Plumbing, Heating & Air Conditioning has earned a reputation for trustworthy and high-quality plumbing services. As a family-owned business, we understand the importance of protecting your home and keeping your family comfortable.
Here’s what sets us apart:
Expert Technicians: Our plumbers are fully licensed, trained, and experienced in all aspects of toilet repair and installation.
Customer-First Service: We prioritize clear communication, honest pricing, and timely service.
Comprehensive Solutions: We handle it all from minor toilet repairs to full bathroom plumbing overhauls.
Emergency Availability: Plumbing issues don’t wait for business hours—and neither does the Schneider team.
Whether you’re dealing with a running toilet, a hidden leak, or a complete replacement, we are ready to help with reliable solutions and top-tier craftsmanship.
Final Thoughts
Toilets are essential to your home’s daily function, and when something goes wrong, prompt action is key. While some simple repairs can be handled on your own, more complex issues like leaks, cracks, or recurring clogs require professional attention. Understanding when to call for toilet repair services not only protects your home from damage but also ensures your plumbing system remains efficient and safe.
Don’t wait for a small problem to become a big one. Contact us today to schedule expert toilet repair services. Proudly serving Jackson and Jennings County for over 70 years, we’re committed to keeping your home’s plumbing—and your life—running smoothly.
Let us help you get back to comfort. Call now to request service.