The Schneider Team represents the licensed plumbers and HVAC technicians at Schneider Plumbing, Heating and Air Conditioning, a family-owned business serving Seymour, Indiana since 1948. Founded by Louis Schneider and now run by the third generation of the family, our team combines decades of field experience with a straightforward approach to service. We write to help homeowners understand their systems, spot problems early, and know when it's time to call a professional.
Flooding and water damage are among the most costly and disruptive problems homeowners face. For those living in areas prone to heavy rainfall, snowmelt, or high groundwater, sump pump installation can be a critical step toward protecting your home’s foundation, belongings, and long-term value. Whether your basement has flooded before or you are taking proactive steps before the next rainy season, understanding when and why to install a sump pump could save you thousands.
What a Sump Pump Does and Why It Matters
A sump pump is a device installed in the lowest point of a basement or crawlspace, typically inside a specially constructed pit called a sump basin. Its job is to collect water that accumulates around your foundation and pump it safely away from the home before it causes damage.
When water rises in the sump pit, whether from heavy rain, snowmelt, or rising groundwater, the pump activates automatically and moves that water to a designated drainage area such as a dry well, storm drain, or municipal sewer. The result is a drier, safer basement without you having to do a thing.
A properly installed sump pump system:
Prevents basement flooding and the property damage that follows
Protects against mold and mildew, which can develop within 24 to 48 hours of water intrusion
Preserves structural integrity by keeping foundation walls consistently dry
Adds measurable value to your home by reducing flood risk for future buyers
Reduces the risk of costly water leak damage going undetected beneath flooring and behind walls
Signs That Sump Pump Installation Is Necessary for Your Home
Most homeowners do not think about sump pumps until water is already on the basement floor. Catching the warning signs early is far less expensive than responding to a flood after the fact.
Your Basement Has a History of Moisture or Flooding
Even a single flood event is a strong signal that your home is vulnerable. But flooding is not the only indicator. Watch for these early warning signs:
Water stains along the base of basement walls or on the floor
Efflorescence, the white chalky residue left behind when water evaporates through concrete
Musty odors that suggest mold or mildew growth behind finished surfaces
Peeling paint, warped paneling, or bubbling drywall
Pooled water during or after heavy rainfall, even if it drains on its own
Any of these signs warrants a professional assessment. In many cases, sump pump installation in Seymour can be scheduled and completed before the next major rain event.
Your Home Is in a Low-Lying or High Water Table Area
Homes in valleys, near rivers or streams, or on soil with poor natural drainage face a higher baseline risk of water intrusion. Indiana’s geography, with its mix of clay-heavy soils and seasonal flooding, makes this a real concern throughout Jackson and Jennings County. If your property sits in a flood zone or has a high water table, a sump pump is not optional, it is essential.
Not sure about your property’s flood risk? The FEMA Flood Map Service Center allows you to look up your address and see your official flood zone designation.
Your Area Gets Frequent or Heavy Storms
Southern Indiana regularly sees intense spring and summer thunderstorms that drop large amounts of rainfall in short windows. When the ground is already saturated, stormwater has nowhere to go but through cracks in your foundation. Even homes that have never flooded can become vulnerable after a series of heavy storms that raise the local water table.
You Are Finishing or Renovating Your Basement
If you are investing money in flooring, drywall, insulation, or electrical work in your basement, protecting that investment should be part of the plan. Even minor water intrusion after a renovation can destroy materials that cost far more to repair than the sump pump would have cost upfront. Installing a sump pump before finishing a basement is standard practice for good reason.
You Recently Purchased a Home Without One
Not all homes come equipped with sump pumps, particularly older construction. If your home inspection flagged moisture concerns or you purchased a home with a basement in a wet climate, adding a sump pump is one of the smartest first investments you can make as a new homeowner.
Sump Pump Installation: Types of Systems and How to Choose
Submersible Sump Pumps
Submersible pumps sit directly inside the sump pit and operate fully submerged during use. They are quieter than pedestal models, handle higher water volumes, and are the preferred choice for homes with serious or recurring flooding. They tend to cost more upfront but offer a longer operating lifespan and greater reliability under heavy demand.
Pedestal Sump Pumps
Pedestal pumps mount above the sump basin with only the intake extending into the pit. They are easier to access for servicing and generally less expensive. They work well in homes with smaller pits or lighter, less frequent water exposure. The motor is exposed above the water line, making it simpler to maintain but slightly louder during operation.
Which Type Is Right for Your Home?
The right choice depends on your sump pit dimensions, the volume of water your basement typically sees, and your budget. A licensed plumber in Seymour can evaluate your specific situation and recommend the correct pump type, motor size, and discharge setup to keep your basement dry in even the worst conditions.
Battery Backup Systems: Why They Matter More Than You Think
Here is a scenario that plays out regularly during Indiana storms: the power goes out at the exact moment your basement needs the sump pump most. Without a battery backup, the pump is useless during the outage, and water rises unchecked.
A battery backup sump pump system automatically activates when the primary pump loses power, providing continuous protection even during extended outages. Some systems include smart monitoring that sends alerts to your phone if the backup engages or if battery levels drop. For a detailed look at what backup systems cost and which options offer the best value, see our breakdown of sump pump battery backup costs.
Adding a battery backup at the time of initial installation is almost always less expensive than retrofitting one later.
Sump Pump Installation Cost: What to Expect
Professional sump pump installation including parts and labor typically runs between $1,000 and $3,000 depending on:
Cost Factor
Low End
High End
Pedestal pump (parts + labor)
$500
$1,200
Submersible pump (parts + labor)
$800
$2,000
Battery backup system
$300
$1,000
Sump pit excavation (new install)
$500
$1,500
Discharge line extension
$100
$500
To put this in perspective: a single basement flood averages $10,000 to $30,000 in water damage repairs according to industry estimates. A properly installed sump pump system is one of the highest-return protective investments a homeowner can make.
The Professional Installation Process: Step by Step
Sump pump installation is not a DIY project. Proper installation requires an understanding of soil conditions, local water table behavior, building codes, and electrical safety. Here is what professional installation typically involves:
Site Assessment: Evaluating your basement or crawlspace to identify the lowest point and best sump pit location relative to your drainage needs.
Pit Excavation: Digging the sump basin and setting up gravel bed and drainage tile if needed.
Pump and Basin Installation: Setting the pump, liner, discharge line, and check valve to prevent backflow.
Electrical Connection: Connecting the pump to a dedicated circuit with GFCI protection and installing battery backup wiring if applicable.
Testing and Verification: Running the system through multiple cycles and confirming the discharge line routes water well away from the foundation.
Errors during any of these steps can result in a pump that fails when you need it most or one that discharges water back toward the home. Always use a licensed professional for this work.
How Long Does a Sump Pump Last?
The average sump pump lasts 7 to 10 years with regular maintenance. Submersible models may reach the lower end of that range due to constant submersion, while pedestal models in lighter-use situations can exceed 10 years. Signs your existing pump may be nearing the end of its useful life include:
Unusual noises such as rattling, grinding, or excessive vibration
Running continuously without shutting off
Visible rust or corrosion on the pump body or pit liner
Slow or inconsistent water removal
The system is 7 or more years old and has never been serviced
If your pump is showing any of these signs, do not wait for a flood to confirm the failure. Proactive replacement before storm season is far less stressful and less expensive than an emergency call in the middle of the night.
Sump Pump Maintenance: Keeping Your System Ready Year-Round
Installing a sump pump is only part of the equation. Regular maintenance ensures it performs when conditions demand it most.
Test it quarterly: Pour a bucket of water into the pit and confirm the float activates the pump and the water discharges properly.
Clean the pit annually: Remove debris, gravel, and sediment that can clog the intake screen.
Inspect the discharge line: Make sure the outlet is clear of ice in winter and that water is directed well away from the foundation.
Check the battery backup: Test backup battery charge and replace the battery every 3 to 5 years even if it appears functional.
Schedule professional service: An annual inspection by a local plumber in Seymour catches issues before they become failures.
When Is the Best Time to Schedule Sump Pump Installation?
The best time to install a sump pump is before you need it. Specifically, consider scheduling installation:
Before spring thaw and Indiana’s peak rainy season (March through June)
Before finishing or renovating a basement space
Shortly after purchasing a home that lacks an existing system
After noticing any signs of moisture, even if flooding has not occurred yet
When replacing an aging pump that is 7 or more years old
Emergency installations during an active flood are possible but cost more, take longer, and often cause unnecessary stress. Planning ahead gives you time to choose the right system and get the job done properly.
Is sump pump installation necessary if my basement has never flooded?
Yes, in many cases. A basement that has never flooded may still be at risk due to soil type, proximity to water sources, or aging foundation waterproofing. A sump pump acts as insurance against future water intrusion. An inspection by a sump pump installation professional in Seymour can help you assess your actual risk level.
How deep does a sump pit need to be?
Most sump pits are dug to a depth of 18 to 24 inches and measure roughly 18 inches in diameter, though the exact dimensions depend on your water volume and pump type. Your installer will size the pit based on a site assessment rather than a one-size-fits-all spec.
Can I install a sump pump myself?
Technically yes, but it is not recommended. Improper pit sizing, incorrect float settings, poor discharge routing, or faulty electrical connections can all result in a system that fails at the worst possible moment. Licensed installation ensures the job meets local code and the system performs as intended.
What happens if the power goes out during a storm?
Without a battery backup, your sump pump will not operate during a power outage. Since outages frequently accompany the same storms that stress your drainage system most, a battery backup is a critical companion to any primary sump pump. Review your backup options in our guide to sump pump battery backup costs.
Does homeowners insurance cover sump pump failure?
Standard homeowners insurance typically does not cover damage from sump pump failure or basement flooding. You may be able to add a water backup endorsement to your policy for an additional premium. Check with your insurance provider for details specific to your coverage.
How long does sump pump installation take?
For a straightforward replacement of an existing pump in an already-established pit, installation typically takes 2 to 4 hours. New installations requiring pit excavation may take a full day. Your contractor can give you a firm timeline during the assessment.
Protect Your Home Before the Next Storm
Water damage can be devastating, but with the right protection in place, your home’s foundation and lower level can stay dry through whatever Indiana weather brings. Schneider Plumbing, Heating & Air Conditioning has been protecting homes throughout Jackson and Jennings County for over 70 years. Our licensed team will assess your basement, recommend the right system, and install it to last.
Do not wait until you are standing in water to make the call. Contact us today for a professional assessment and a solution built around your home’s specific needs.
If you’ve ever wondered, “Why is my garbage disposal not working properly?” You’re certainly not alone. Garbage disposal repair is a common household concern. This small but mighty appliance handles a lot of mess and waste, and when it stops working efficiently—or worse, stops working at all—it can create serious inconvenience in your daily kitchen routine.
Understanding the common issues behind disposal malfunctions, learning when to try a DIY fix, and knowing when to call in a pro can save you time, money, and stress.
Common Garbage Disposal Problems
Garbage disposals may seem like simple devices, but several things can go wrong with them, especially as they age or are used improperly.
Strange Noises and Leaks
One of the first signs something’s off is strange sounds—metallic clanking, humming, or grinding noises that weren’t there before. These usually indicate that:
A foreign object (like a spoon or bottle cap) has fallen into the disposal.
Internal parts, such as impellers or blades, are damaged or loose.
The motor is trying to run but is jammed.
If your disposal is leaking, the culprit could be:
A loose sink flange (where the unit connects to the sink)
A cracked or corroded housing
Leaky drain or dishwasher connection hoses
Leaks should be addressed quickly to avoid water damage beneath your sink.
The Disposal Won’t Turn On
If the disposal doesn’t turn on at all—no noise, no hum—it may not be receiving power. Check:
If it’s plugged in (easy but often overlooked)
Your circuit breaker
The unit’s built-in reset button
If none of these solves the problem, the motor may have burned out, or the internal wiring may be faulty.
Disposal Hums but Doesn’t Grind
This is typically a jammed flywheel or impeller. When something gets stuck, and the motor can’t spin, you may hear a humming sound, followed by the unit shutting off after a few seconds. It’s a safety feature to prevent burnout.
Never continue to run a humming disposal—it could overheat the motor or trip your breaker.
DIY Fixes vs. Professional Repair
Not all garbage disposal issues require a service call. But some do. Knowing where to draw the line is key to fixing problems quickly and safely.
Resetting the Unit Safely
Most disposals have a small red or black reset button on the bottom. If your unit suddenly stops working, try this:
Turn off the disposal and unplug it.
Check inside the chamber for jams (using tongs or pliers—never your hand).
Press the reset button.
Plug it back in and test it.
If the unit powers back on, it likely shut down to prevent damage. If not, it might be an electrical or motor issue that needs attention.
Unjamming a Stuck Disposal
If your disposal hums but doesn’t spin, it could be jammed. Here’s a DIY method:
Turn off the power to the unit.
Use a disposal wrench or hex key (usually ¼ inch) to manually rotate the impeller by inserting the tool into the bottom center socket.
Wiggle it back and forth to dislodge the jam.
Try running the disposal again.
If this doesn’t work—or if you hear grinding or metal-on-metal noises—stop and call a professional to avoid further damage.
When to Call a Professional
It’s time to bring in the experts if:
You smell burning or see smoke
The disposal trips the breaker repeatedly
Leaks appear in hard-to-reach or corroded areas
The unit grinds slowly, even when not jammed
You’ve tried a reset and manual unjam, but nothing changes
Professional plumbers have the tools and expertise to handle internal repairs, leaks, and electrical issues safely and efficiently. They can also advise if your disposal is nearing the end of its life and should be replaced.
Preventing Future Disposal Issues
A properly used and maintained garbage disposal should last 8–15 years. Here’s how to get the most out of yours.
Foods You Should Never Put Down
Despite the name, a garbage disposal isn’t a catch-all waste chute. It’s designed to handle small food scraps, not everything from your plate. Avoid putting these items into your disposal:
Fibrous foods: Celery, corn husks, onion skins—these wrap around blades.
Starchy foods: Pasta, rice, and potato peels swell with water and cause clogs.
Bones and shells: These are too hard and can damage internal components.
Grease and oil: They cool into a sticky sludge that clogs pipes.
Coffee grounds: They clump together in the drain.
Eggshells: Often believed to sharpen blades (a myth), they actually gum up the works.
When in doubt, throw it out.
Run Water Before and After Use
Always run cold water before turning on the disposal and continue running water for 15–30 seconds afterward. This helps:
Flush debris through the drain
Prevent food bits from building up
Keep fats from solidifying
Cold water is preferred because it keeps grease in solid form, allowing it to break up and flush through instead of coating your pipes.
Clean It Regularly
To eliminate odors and keep your disposal fresh:
Toss in a few ice cubes and citrus peels once a week.
Sprinkle baking soda and vinegar inside, let it sit, and flush with hot water.
Use a disposal cleaning brush or sponge wand to scrub under the rubber splash guard (where gunk often hides).
These habits reduce bacteria, sludge buildup, and unpleasant smells.
Inspect for Wear and Tear
Over time, your disposal may show signs of wear:
Blades dull or corrode
Seals weaken
Housing cracks
If you hear unusual noises or see leaks, it may be time for an inspection—even if the issue seems minor. Catching these issues early can prevent expensive repairs later.
Reliable Help Is Just a Call Away
If your garbage disposal isn’t working properly, don’t wait for a minor inconvenience to become a major plumbing disaster. Whether it’s a jammed impeller, a leaking flange, or a dead motor, the team at Schneider Plumbing, Heating & Air Conditioning is ready to help.
With over 70 years of service in Jackson and Jennings County, our family-owned business is committed to keeping your home comfortable, safe, and running smoothly. We specialize in plumbing, heating, and cooling services that prioritize quality, professionalism, and long-term reliability.
Our licensed plumbers have the experience and tools needed to:
Diagnose and fix garbage disposal issues
Perform expert installations and replacements
Offer maintenance advice to keep your unit working properly
Don’t let a faulty disposal disrupt your kitchen. Call us today to schedule a service. Your comfort is our mission, and your satisfaction is our guarantee.
Your home’s plumbing system works hard behind the scenes, quietly ensuring waste and wastewater are properly disposed of. But when something goes wrong, it can quickly disrupt daily life. One of the most critical components of this system is the sewer line. If it becomes compromised, the consequences can range from minor inconveniences to major, costly disasters. Understanding the signs that you need sewer line repair can help you act early and avoid significant plumbing issues.
Common Warning Signs of Sewer Line Damage
Recognizing the early indicators of a failing sewer line can save you from serious repair bills. Keep an eye out for the following red flags:
Foul Odors and Slow Drains
A persistent foul odor coming from your drains, toilets, or even your yard can be one of the earliest signs of sewer line trouble. The unpleasant smell of sewage indicates that waste isn’t being properly transported away from your home. If the issue persists despite cleaning and flushing your drains, it may point to a break, blockage, or deterioration in the sewer line.
Slow drainage is another symptom. If you notice that multiple drains in your home are moving sluggishly, it’s a strong indicator of a deeper problem. A single slow drain can be a local clog, but slow drains throughout your home often mean a blockage in the main sewer line. You may even hear gurgling noises in the toilet or sink drains, a sign that trapped air is bubbling up due to a clog in the line.
Lawn Indentations or Wet Patches
Your sewer line typically runs underground through your yard. When there’s a leak or break, the water and waste have nowhere to go but up and out—often into your lawn.
If you see unexplained wet patches or soggy spots in your yard, especially when it hasn’t rained, this could be due to leaking sewage. You may also notice unusually green or lush grass growing in specific areas. The added moisture and nutrients from waste materials can act like a fertilizer, creating visible differences in your lawn.
Lawn indentations or sinkholes may also develop over a damaged sewer pipe. This erosion is caused by soil displacement as the leaking water washes it away, compromising the structural integrity of your yard.
Frequent Backups and Blockages
Recurrent plumbing backups, particularly in your lower-level fixtures, are another red flag. If plunging and snaking your toilet or sink doesn’t resolve the issue for long, the problem may lie beyond your indoor plumbing.
Backups that occur despite repeated cleaning efforts suggest that there may be tree roots, a collapse, or a large obstruction in the main sewer line. These problems require professional tools and diagnostics to be accurately assessed and repaired.
Mold Growth and Foundation Cracks
Leaking sewer lines can also lead to water damage inside your home. Moisture seeping through walls and floors provides an ideal environment for mold growth. If you notice musty odors, mildew stains, or visible mold in previously dry areas, it’s time to investigate.
Additionally, persistent moisture around your home’s foundation, caused by a leaking sewer line, can cause cracks in the foundation. These structural issues are serious and should not be ignored, as they can compromise your home’s stability.
Why Timely Sewer Line Repair Matters
It might be tempting to delay addressing sewer issues, especially if the signs seem manageable. However, sewer line damage rarely improves on its own. The longer you wait, the worse it becomes—and the more costly the repair.
Preventing Major Property Damage
A small leak or clog in your sewer line can quickly evolve into a significant rupture, causing extensive damage to your home and yard. Flooded basements, ruined flooring, and contaminated soil are just a few of the expensive consequences of neglecting sewer problems.
Avoiding Health Hazards
Sewage is a breeding ground for bacteria, parasites, and viruses. Exposure to sewage due to a broken pipe can cause serious health issues, including skin infections, gastrointestinal problems, and respiratory ailments. Timely repairs eliminate these health risks and keep your home safe.
Saving Money in the Long Run
Catching and repairing sewer issues early is far less expensive than emergency repairs or complete pipe replacement. Preventive maintenance and early intervention can save you thousands of dollars and avoid the inconvenience of lengthy repair projects.
What to Expect from a Sewer Line Service
When you contact a professional plumbing company like Schneider Plumbing, Heating & Air Conditioning, you’re not just getting a temporary fix. You’re investing in the long-term functionality and safety of your home.
Pipe Inspection and Repair Options
Modern plumbing companies use state-of-the-art technology to diagnose sewer line issues. Here’s what you can expect:
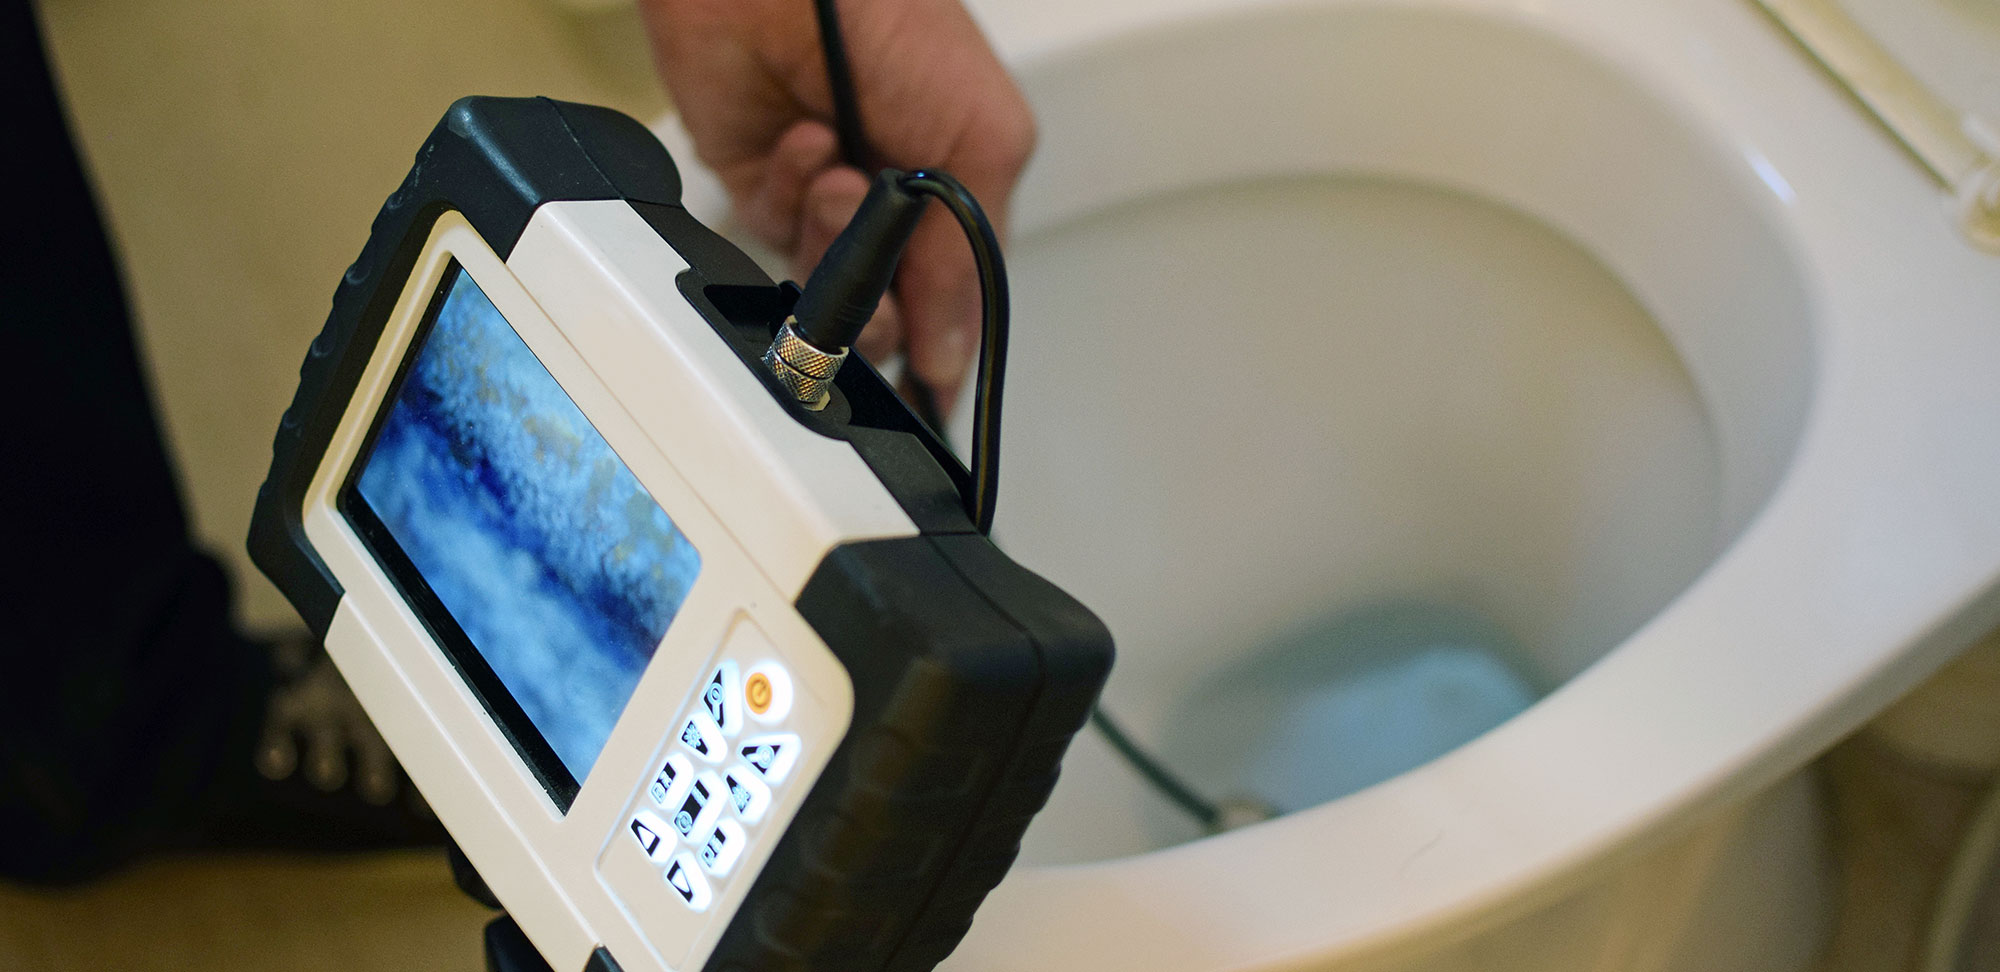
Video Camera Inspection: A small, waterproof camera is inserted into your sewer line, allowing the technician to identify blockages, cracks, corrosion, or root intrusions in real-time. This accurate assessment ensures that the correct issue is addressed from the start.
Cleaning and Clearing: If the issue is caused by a blockage or buildup, hydro jetting may be used. This high-pressure water method clears debris, grease, and even small roots from the pipes without damaging them.
Trenchless Repairs: Whenever possible, technicians will opt for trenchless repair techniques such as pipe lining or pipe bursting. These methods minimize excavation, reduce labor costs, and preserve your landscaping.
Traditional Excavation: In severe cases where the pipe is collapsed or severely damaged, excavation may be necessary. A portion of your yard or foundation may need to be dug up to access and replace the affected section of pipe. Reputable contractors will work with you to ensure the area is restored as close to its original condition as possible.
Professional Recommendations and Preventive Advice
A good plumbing company won’t just fix your current issue—they’ll also help you avoid future problems. Technicians may provide advice on:
Proper disposal of grease and food waste
Tree root management
Routine pipe inspections
Drain cleaning schedules
This added value ensures that your plumbing system stays healthy and functional long after the initial repair.
Trust the Experts at Schneider Plumbing, Heating & Air Conditioning
When it comes to something as important as your home’s sewer line, you need a team you can trust. For over 70 years, Schneider Plumbing, Heating & Air Conditioning has proudly served families across Jackson and Jennings County. As a family-owned business, we treat our customers like neighbors—because they are.
Whether you’re dealing with strange smells, soggy lawns, or recurring clogs, our expert technicians are equipped to diagnose and repair your sewer line quickly and effectively. Our goal is always the same: to make your home more comfortable, safe, and efficient.
Contact Us Today
If you suspect you may need sewer line repair, don’t wait for a minor issue to turn into a major expense. Contact us today to schedule an inspection. Our friendly, knowledgeable team is ready to help you get your plumbing system back on track with reliable, long-lasting solutions.
Choosing between a tankless vs tank water heater is one of the bigger plumbing decisions a homeowner makes. The system you pick affects your comfort, your energy bills, and how often you deal with cold showers or a failing unit for the next 10 to 20 years. Both options work well, but they excel in different situations, and the right answer depends on your household, your budget, and how long you plan to stay in the home.
At Schneider Plumbing, Heating & Air Conditioning, we install and service both types, so we have no reason to push one over the other. Here is an honest comparison of how each system works, what each really costs, and who each one fits best.
Tankless vs Tank Water Heater: How Each System Works
How a Traditional Tank Water Heater Works
A traditional storage water heater is an insulated tank, typically holding 20 to 80 gallons, that heats water and keeps it ready at a set temperature. When you open a hot tap, hot water leaves the top of the tank and cold water refills the bottom, where the burner or heating elements bring it back up to temperature.
The strength of this design is simplicity and a ready reserve. The weakness is standby heat loss, because the tank keeps reheating stored water throughout the day and night even when no one is home. Once you drain the tank during heavy use, you wait for it to refill and recover.
How a Tankless Water Heater Works
A tankless water heater, also called a demand-type or instantaneous water heater, has no storage tank. When a hot tap opens, water flows through the unit, where a gas burner or electric elements heat it on the spot. Hot water is produced only when you use it, so there is no standby loss and no tank to run empty.
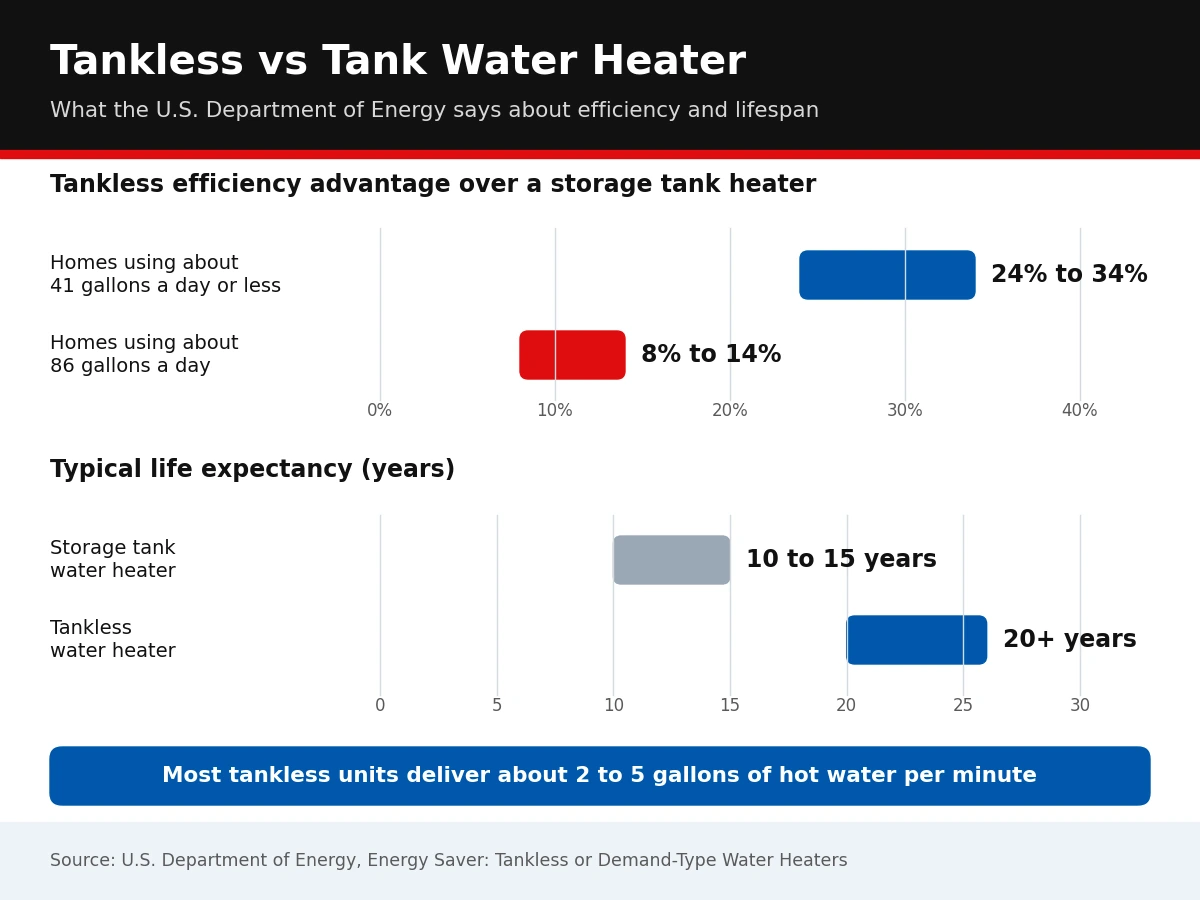
The limit on a tankless unit is flow rate rather than storage. According to the U.S. Department of Energy, most tankless units deliver about 2 to 5 gallons of hot water per minute, and gas-fired models generally produce higher flow rates than electric ones. A single unit can struggle if several fixtures run at once.
Tankless vs Tank Water Heater: Side-by-Side Comparison
A storage tank heater constantly works to keep a full tank hot, whether or not anyone uses the water. Tankless units skip that step by heating water only when a tap is open, which is why they generally use less energy for the same amount of hot water.
How Much You Can Actually Save
The Department of Energy puts numbers on the difference. For homes that use about 41 gallons of hot water a day or less, a tankless unit can be 24% to 34% more energy efficient than a storage tank model. For homes that use a lot of hot water, around 86 gallons a day, the advantage shrinks to about 8% to 14%. DOE also notes that installing a unit at each hot water outlet can raise the savings to 27% to 50%, though that costs more up front.
In plain terms, the smaller your household’s hot water use, the more a tankless heater helps your bills. A busy household with several showers and appliances running every day will see a smaller percentage gain.
Hot Water Supply and Flow Rate
A tank heater gives you a full reserve at once, so running a shower and a dishwasher together is rarely a problem until the tank runs low. A tankless heater never runs out, but it can only heat so much water per minute. If two showers and a washing machine run at once, a single unit may not keep up. Larger homes often solve this with a higher-capacity unit or two units working in parallel, which adds to the cost.
Incoming water temperature also matters. Colder groundwater in winter means the unit has to work harder to reach your set temperature, which lowers the flow rate it can sustain. Proper sizing for your coldest months is one of the most important parts of a tankless installation.
Lifespan and Maintenance
Per the Department of Energy, most tankless water heaters last more than 20 years and have replaceable parts that can extend that further, while storage tank heaters typically last 10 to 15 years. A tank usually fails when the steel corrodes through, and at that point the whole unit has to be replaced.
Both systems need routine care. Tank heaters benefit from an annual flush to clear sediment and a periodic anode rod check. Tankless units need descaling to remove mineral buildup, and that matters most where water is hard. If scale is a recurring problem in your home, a water softener installation protects either type of heater and can extend the life of your fixtures and appliances too.
Space Requirements
Tankless water heaters: compact and typically wall-mounted, which frees up floor space in utility closets, basements, and garages.
Tank water heaters: need a dedicated footprint and clearance for venting, service access, and a drain pan.
Tankless Water Heater Cost vs Tank Water Heater Cost
Upfront and Installation Costs
Tankless units cost more to buy and usually more to install. The ranges below reflect typical contractor pricing and will vary with the model, fuel type, and what your home needs.
Cost Item
Traditional Tank
Tankless
Unit cost
$500 to $1,200
$1,000 to $2,500 or more
Installation
$600 to $1,500
$1,500 to $3,500
Typical installed total
About $1,100 to $2,700
About $2,500 to $6,000
The gap exists because a tankless installation often involves more than swapping one box for another. It may require a larger gas line, new venting, or added electrical capacity, and old connections frequently need to be reworked.
What Can Raise Tankless Installation Costs
Gas line upgrades: tankless burners draw more gas at once, and an existing line may be too small.
New venting: high-efficiency units often need different venting than an old tank heater.
Electrical upgrades: electric tankless models can require significant amperage and dedicated circuits.
Relocating the unit: moving from a tank location to a wall mount changes piping and routing.
Multiple units: larger households may need more than one heater to meet peak demand.
A licensed plumber can check your gas supply, venting, and electrical panel before you commit, so the quote reflects the real scope. Our team handles water heater installation and replacement for both tank and tankless systems, including the supporting upgrades that make a new unit perform the way it should.
Operating Costs and Payback
Because tankless units use a smaller amount of energy for the same hot water, they cost less to run each month. How much less depends on your fuel prices and how much hot water you use. With a higher purchase price and a percentage-based savings rate, the payback period can range from a few years to well beyond a decade. Homeowners who plan to stay put for many years, and who use moderate amounts of hot water, tend to see the strongest return. Those who may sell in the near term often come out ahead with a well-sized tank heater.
How Most U.S. Homes Heat Water
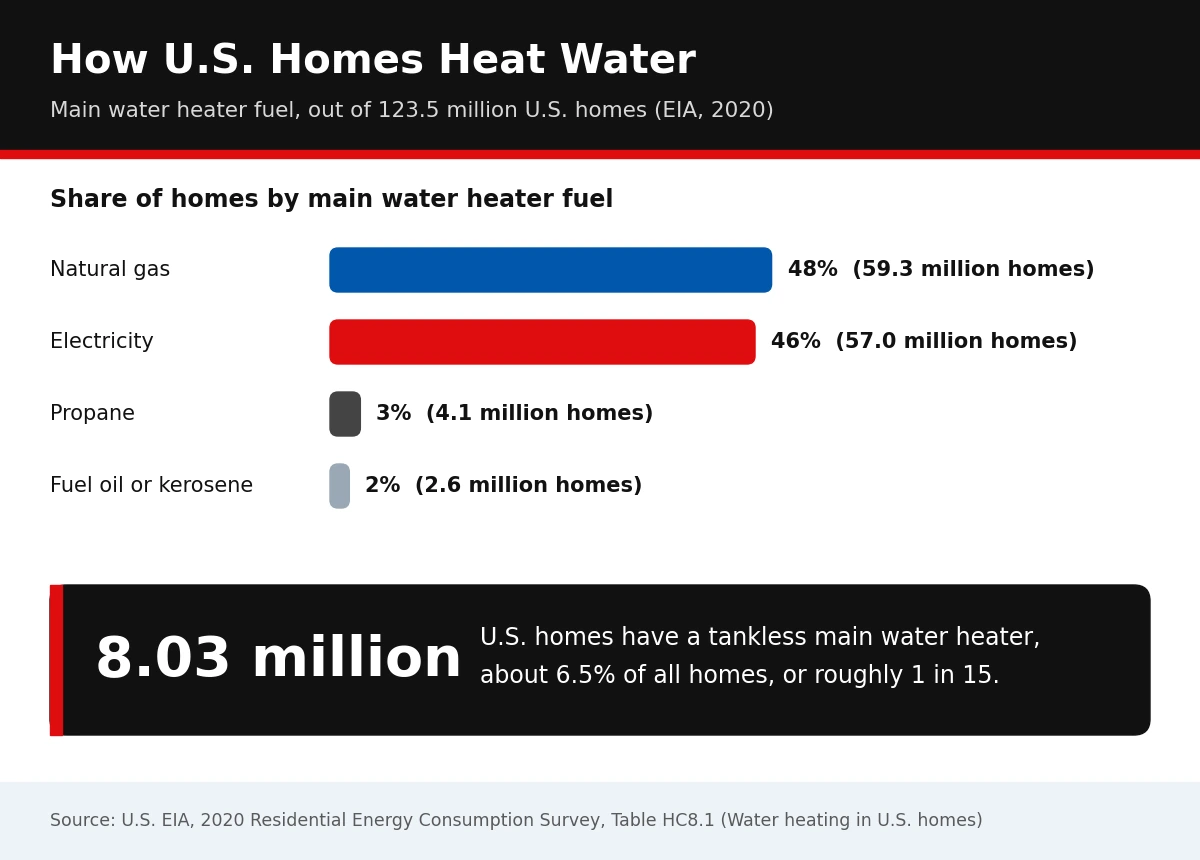
Fuel type shapes both the cost and the performance of whichever system you choose. Federal survey data shows how evenly split the country is between gas and electricity, and how uncommon tankless units still are.
Gas-fired tankless heaters generally deliver higher flow rates than electric ones, which makes them the better fit for larger households. Electric tankless models are simpler to vent but can demand a lot of electrical capacity. If your home already has natural gas service, a gas unit is usually the more practical way to get strong flow. If you are all-electric, a tankless unit is still possible, but it deserves a careful look at your panel and wiring.
Which Water Heater Is Right for Your Home?
Household Size and Hot Water Habits
One to three people with moderate use: tankless is often an excellent fit, and this is where the efficiency gains are largest.
Large families with overlapping demand: a properly sized tank heater is simpler and less expensive, though a higher-capacity tankless unit or two units can also work.
Budget and Time in the Home
Tight upfront budget or a short stay: a tank heater costs less now and is easier to replace later.
Long-term ownership: a tankless unit’s longer life and lower operating cost can offset the higher price over time.
Space, Climate, and Water Quality
Limited space: tankless frees up floor area.
Cold winters: colder incoming water reduces tankless flow, so sizing matters more.
Hard water: both types need attention, and tankless units typically need descaling on a regular schedule.
Tankless vs Traditional Water Heater: Quick Decision Guide
Your Situation
Better Fit
Small household, low to moderate hot water use
Tankless
Large household with frequent overlapping use
Tank, or a larger tankless setup
Staying in the home 10+ years
Tankless
Lowest upfront cost or planning to sell soon
Tank
Tight utility space
Tankless
There is also a third option worth knowing about. Heat pump water heaters pull heat from the surrounding air, and the Department of Energy notes they can be two to three times more energy efficient than conventional electric resistance models. They work best in warm, open spaces, so they are not right for every home, but they are worth asking about if you are electric.
Get Sizing and Installation Right
Most disappointments with either system come from poor sizing or a rushed installation, not from the technology itself. Before you buy, have a pro review your daily hot water use, fuel type, available space, and local code requirements. An experienced licensed plumbing contractor can walk through those details and give you a straight recommendation instead of a sales pitch.
Tankless vs Tank Water Heater FAQs
Is a tankless water heater better than a tank water heater?
It depends on your household. Tankless units are more energy efficient and last longer, with the biggest savings in homes that use less hot water. Tank heaters cost less up front and handle heavy simultaneous use more easily, so neither is better for every home.
How much more efficient is a tankless water heater?
According to the U.S. Department of Energy, tankless water heaters can be 24% to 34% more energy efficient for homes using about 41 gallons of hot water a day or less, and 8% to 14% more efficient for homes using around 86 gallons a day.
How long do tankless and traditional water heaters last?
The Department of Energy reports that most tankless water heaters last more than 20 years, while storage tank water heaters typically last 10 to 15 years. Proper maintenance helps both types reach the upper end of those ranges.
How much does a tankless water heater cost compared to a tank?
A typical tank water heater runs about $1,100 to $2,700 installed, while a tankless unit commonly runs about $2,500 to $6,000 installed. Gas line, venting, and electrical upgrades can push tankless costs higher.
Can a tankless water heater run multiple showers at once?
Sometimes, but flow rate is the limit. Most tankless units deliver about 2 to 5 gallons per minute, so a single unit may struggle with several fixtures at once. Larger homes often use a higher-capacity unit or more than one unit.
Do tankless water heaters need maintenance?
Yes. Tankless units need periodic descaling to remove mineral buildup, especially where water is hard. Tank heaters need an annual flush and an occasional anode rod check. Regular maintenance protects efficiency and extends the life of either type.
Is a tankless water heater worth it?
It is usually worth it for homeowners who plan to stay many years, use moderate amounts of hot water, and want lower operating costs, a longer lifespan, and a smaller footprint. If you may sell soon or have very high simultaneous demand, a tank heater can be the better value.
Make a Confident Water Heater Decision
There is no single winner in the tankless vs tank debate, only the better match for your home. Tankless units reward moderate hot water use and long-term ownership with lower energy use and a longer life. Tank heaters win on upfront cost and simplicity. Understand your hot water habits, your fuel type, and your timeline, and the right choice usually becomes clear.
Schneider has been family-owned since 1948, and we would rather help you make the right call than the biggest sale. If you are weighing a new water heater or your current one is showing its age, talk with our team about your water heater options and we will help you choose the system that fits your household and your budget.
Investing in a new HVAC system is a significant decision for any homeowner or business. A high-quality HVAC installation not only ensures year-round comfort but also helps reduce energy bills, improves indoor air quality, and extends the lifespan of your heating and cooling equipment. However, even the best HVAC units can underperform or fail prematurely if installation mistakes occur.
Planning Your HVAC Installation
Proper planning is the foundation of any successful HVAC project. Before tools are picked up or components are installed, a strategic approach ensures you’re not only selecting the right system but also setting it up for optimal performance.
Essential Pre-Installation Steps
1. Load Calculation (Manual J)
One of the most overlooked yet crucial steps in HVAC installation is performing a proper load calculation. This determines the precise heating and cooling requirements of your home based on square footage, insulation, window placement, climate, and more. Skipping this can lead to choosing an oversized or undersized system, resulting in inefficient operation, frequent cycling, and uneven temperatures.
2. Ductwork Inspection and Design
Even a top-tier HVAC system won’t function efficiently if paired with leaky or poorly designed ductwork. Before installation begins, your contractor should assess the condition and layout of the duct system. Sizing, sealing, and insulating ducts are all essential to maintaining proper airflow and energy efficiency.
3. Home Assessment and System Selection
Each home is unique, and your HVAC system should reflect that. Choosing the wrong type of system for your home size or layout is a common misstep. Whether it’s a traditional split system, heat pump, or ductless mini-split, your installer should match the equipment to your needs and preferences. Additionally, considering energy efficiency ratings (like SEER and AFUE) ensures long-term savings.
4. Permit and Code Compliance
Many homeowners don’t realize that HVAC installations often require permits and must adhere to local codes. Failing to secure the proper paperwork can result in fines or the need to redo the installation. A reputable HVAC contractor will handle permitting and ensure compliance with state and municipal regulations.
Identifying Common Installation Mistakes
Even with the best intentions, mistakes during HVAC installation can severely impact performance and safety. Awareness of these issues is key to making informed decisions.
Lessons Learned from the Experts
1. Incorrect System Sizing
A system that’s too large will short-cycle, turning on and off frequently and wearing down components faster. On the other hand, an undersized system will struggle to meet demand, running constantly and consuming more energy. Proper sizing—again, through a Manual J load calculation—is the cornerstone of efficient HVAC performance.
2. Poor Ductwork Sealing
Leaky ducts can lead to a loss of 20-30% of conditioned air. If ducts are not sealed correctly, this can result in uneven temperatures, higher utility bills, and overworked systems. Using mastic sealant or metal-backed tape (never duct tape) ensures proper sealing.
3. Improper Refrigerant Charging
Charging the system with the incorrect amount of refrigerant can lead to inefficiencies, freezing coils, and system failure. This is not a DIY task; it must be done with precision tools by a licensed professional following the manufacturer’s specifications.
4. Ignoring Manufacturer Guidelines
Each HVAC unit has specific installation requirements. Deviating from the manufacturer’s guidelines—even slightly—can void warranties and reduce the system’s effectiveness. Whether it’s clearances, orientation, or installation techniques, details matter.
5. Insufficient Airflow
Restricting airflow by using improper filters, poorly designed duct systems, or failing to clean air vents can force the HVAC unit to work harder than necessary. Over time, this contributes to wear and tear and higher energy usage.
6. Thermostat Placement
The thermostat controls your system, so its placement is vital. Installing it near windows, vents, or in direct sunlight can cause inaccurate readings, leading to over- or under-heating and cooling. It should be placed in a central location, away from obstructions and heat sources.
7. Skipping Post-Installation Testing
Every system should be tested after installation to ensure it operates as expected. This includes checking system pressures, verifying airflow, ensuring proper temperature differentials, and inspecting for leaks. Neglecting this step can mean problems go undetected until they worsen.
Expert Tips for a Successful Setup
To avoid the pitfalls above and enjoy a long-lasting, efficient HVAC system, follow these expert tips designed to ensure a smooth installation process from start to finish.
Best Practices and Recommendations
1. Work with a Licensed, Experienced Contractor
The single most important decision you’ll make in your HVAC installation journey is choosing the right contractor. Experienced professionals understand the nuances of different systems, local code requirements, and how to tailor installation to your home’s unique needs.
Look for certifications such as NATE (North American Technician Excellence), EPA licensing, and positive local reviews. Ask for referrals and make sure your contractor offers a satisfaction guarantee.
2. Ask for a Detailed Quote and Project Plan
Transparency is key. Your contractor should provide a written estimate that includes equipment costs, labor, permits, and any additional services. A solid project plan outlines the timeline, what you can expect at each phase, and how issues will be resolved if they arise.
3. Consider Energy Efficiency and Smart Upgrades
Energy-efficient HVAC systems may have a higher upfront cost, but often qualify for rebates and drastically lower your energy bills. Look for ENERGY STAR-rated equipment and consider upgrading to a smart thermostat to optimize temperature settings and savings.
4. Schedule Off-Season Installations When Possible
Demand for HVAC services spikes in summer and winter. Scheduling installations during spring or fall can lead to quicker service, potential discounts, and a more relaxed timeline for work completion.
5. Get a Maintenance Plan from Day One
An HVAC installation isn’t a one-time deal—it’s a long-term investment. Enrolling in a maintenance plan ensures regular tune-ups, priority service, and longer system life. Your installer may offer plans that include seasonal checks, filter replacements, and discounts on repairs.
6. Stay Informed and Involved
While you don’t need to understand every technical detail, being engaged during your HVAC project helps ensure expectations are met. Ask questions, review the installation steps, and request updates as work progresses.
7. Plan for the Unexpected
Hidden issues like damaged ductwork, electrical upgrades, or asbestos may be discovered during installation. A reputable contractor will discuss these with you transparently and offer fair solutions.
Why Professional Installation Matters
It’s tempting to view HVAC installation as just another home improvement project, but the stakes are higher. Improper setup can reduce efficiency by up to 30%, raise utility bills, and cut equipment lifespan in half. Worse yet, poor installation may lead to carbon monoxide leaks, electrical hazards, or fire risks.
A professionally installed HVAC system, by contrast, offers:
Enhanced comfort: Even temperatures throughout the home.
Lower operating costs: Reduced energy waste and smart system optimization.
Peace of mind: Warranties stay intact, and you know it’s done right.
Safety: Compliance with all safety codes and best practices.
Ready to Upgrade Your Comfort? Call Schneider Plumbing, Heating & Air Conditioning
Avoiding HVAC installation mistakes isn’t just about knowing what not to do—it’s about trusting a qualified professional to do the job right the first time. At Schneider Plumbing, Heating & Air Conditioning, we’ve spent over 70 years helping homeowners in Jackson and Jennings County enjoy reliable, efficient indoor comfort.
As a family-owned and operated business, we take pride in treating every home like our own. Our licensed HVAC technicians are trained to deliver flawless installations that maximize system efficiency and longevity. From load calculations and ductwork design to smart thermostat integration and final inspections, we handle every step with precision and care.
Let us help you make the smart choice.
Call us today to schedule your in-home consultation. Whether you’re installing a new system or replacing an outdated one, you can count on us for quality you can feel and service you can trust.